RSS
Showing posts with label perth Recipes. Show all posts

New Outdoor Dining at Fowles Wine

One of the most popular wineries to visit in Victoria, Fowles Wine’s new cellar door sits amidst acres of sprawling lawns and gardens, just 90 minutes from Melbourne.  Recently, Fowles has set a new benchmark in outdoor dining in regional Victoria.


  • Digg
  • Del.icio.us
  • StumbleUpon
  • Reddit
  • RSS

Slightly Sweet & Lightly Salty Butter Popcorn (stays crispy!)

Scooping Slightly sweet and salty butter popcorn into popcorn holder

This is a slightly sweet, slightly salty Butter Popcorn that has real butter flavour you will never be able to buy in bags! I’m also going to share the simple secret to prevent popcorn getting soggy and to keep popcorn crispy for days and days….

Scooping Slightly sweet and salty butter popcorn into popcorn holder

Butter Popcorn – slightly salty & lightly sweet

You know how popcorn goes soggy within 10 minutes when you douse with melted butter? That’s because butter contains 15% water. Yes, water is what is making your popcorn soggy!

So if you’re wondering how to keep popcorn from going soggy, the answer is clarified butter instead of normal butter.

How to keep popcorn crispy

Use clarified butter or ghee instead of normal butter. Clarified butter is simply normal butter that’s simmered to evaporate the water component that makes popcorn soggy. Ghee is a type of clarified butter (tastes the same).

Buy it or make it (it’s dead easy and keeps for months!). In Australia, you’ll find ghee in the Indian section of grocery stores. Clarified butter is common in Europe.

Slightly sweet and salty butter popcorn in a bowl, ready to be eaten

What you need

Here’s what you need: popcorn kernels, salt, icing sugar/powdered sugar and clarified butter (just simmered normal butter! Read on…).

Ingredients in Slightly sweet and salty butter popcorn

Clarified butter (or ghee)

  • Why you need it – for intense buttery flavour while keeping your popcorn crispy instead of going soggy like normal butter does
  • How to make it (or buy it!) – melt butter then simmer for 10 minutes to evaporate the water content. See separate recipe for full directions – How to make Clarified Butter and Ghee.

Note: Ghee is a purer form of clarified butter that is used in Indian cooking. It tastes the same as Clarified Butter which is associated with European cooking (like Swiss Potato Rosti!)

Spoon scooping up homemade ghee

Popcorn Salt

  • Why you need it – because normal salt grains are too large to stick to popcorn. It all ends up at the bottom of the bowl!
  • How to make it – just grind ordinary salt into a fine powder using your chosen method (mortar and pestle, spice grinder). It takes seconds.
  • How much to use – I only use 1/2 teaspoon for 13 cups of popcorn (which is 2/3 cup of kernels). This does not sound like much, but it’s actually double in volume before being ground down into a fine powder and also this popcorn is deliberately made to be only slightly salty because it also gets flavour from a touch of sweet, If it was just salt, I’d probably add a touch more.
How to make popcorn salt - grind into fine powder

Icing sugar / powdered sugar

  • Why you need it – for a light dusting of sweet on the popcorn. Normal sugar won’t stick to popcorn – unless you use lots and melt it, like with Caramel Popcorn!
  • How to do it – use a small sieve to sprinkle it over the popcorn, for even coverage and to remove lumps.
  • How much to use – I only use 2 tablespoons which makes it lightly sweet. Because the whole point of this popcorn is that it’s slightly sweet and slightly salt, an addictive can’t-stop-nibbling combination that won’t have you guzzling down a gallon of water!
Slightly sweet and salty butter popcorn in a container - how to make popcorn stay crispy

Storing – keeping popcorn crispy for days!

Using clarified butter instead of normal butter means the popcorn will stay crispy – not just for the duration of your movie, but for days! Super handy snack stash, school lunches, and making ahead for big gatherings.

As soon as it’s fully cool, transfer to an airtight container then store it in the pantry. Here are a few tips:

  • Goes stale! Popcorn does go stale quite quickly, being the fragile little things they are, so don’t leave them lying around for ages if you want to preserve freshness for another day;
  • Fully cool – Make sure it’s fully cool before putting the lid on. Impatience will result in condensation inside the container which will make your popcorn soggy;
  • Bake to perk – If your popcorn needs a perk up, just pour it into a baking pan (up to about 5cm/2″ deep is fine) then bake in a low 110°C/230°F oven for 30 minutes to dry it out. Note: there will be slight shrinkage.
Slightly sweet and salty butter popcorn in popcorn holders

So now you know the secret to stay-crispy ultra-buttery homemade popcorn! Well actually, those of you who are familiar with my Yellow Movie Popcorn recipe already know these tricks. We’re just bringing everyone else up to speed!

And in case you need a reason to get on the Popcorn Train, here’s 5 reasons why you should should try homemade popcorn:

  1. really butter flavour your can’t buy!
  2. easy to make in large volumes;
  3. healthier than most snacks – see my tips above for Diet Butter Popcorn;
  4. it’s versatile (eg sweet Caramel Corn or savoury Movie Popcorn);
  5. it’s cheap; and
  6. it has fun factor that appeals to kids and grown ups alike!

Movie night tonight?? – Nagi x


Watch how to make it

Scooping Slightly sweet and salty butter popcorn into popcorn holder
Print

Lightly Salted Slightly Sweet Butter Popcorn (crispy for days)

Recipe video above. This is a homemade version of a very popular slightly sweet and salty Butter Popcorn sold at grocery stores (Cobs brand, for those of you in Australia!). I love it – so I replicated it so I could serve giant bowls of it when I have friends around. It's always a hit!
BONUS – stays crispy for days! The secret is clarified butter which is 100% fat. Normal butter is 15% water so it makes popcorn soggy. It's a Movie Popcorn secret!
Course Snacks
Cuisine Western
Keyword butter popcorn, stovetop popcorn
Prep Time 5 minutes
Cook Time 15 minutes
Servings 13 cups
Calories 65cal
Author Nagi

Ingredients

Popcorn:

Popcorn Salt:

  • 1 tbsp salt (you won't use it all, Note 2)

For Tossing:

  • 3 tbsp clarified butter or ghee , melted (Note 1)
  • 1/2 tsp Popcorn Salt (per directions below)
  • 2 tbsp icing sugar / powdered sugar

Instructions

Pop Popcorn:

  • Pop the kernels using your method of choice – popcorn maker or stove (steps below).
  • Heat fat: Heat / melt clarified butter or oil in a large pot over medium high heat (medium for strong stoves). Add a few pieces of popcorn and wait until it pops – this means it is hot enough. Quickly remove popcorn.
  • Add popcorn: Add remaining popcorn, elevate off stove to shake and spread corn out evenly. Cover with a lid. Once the popcorn starts popping in earnest, shake the pot gently once.
  • Done! Remove from heat when the popping stops (when you can count to 3 between pops) and transfer to a (very!) large bowl.

Popcorn Salt

  • Place salt in a mortar and pestle then grind into a fine powder. You could also do this using a spice grinder. You won't use it all, but it's hard to work with less.

Sprinkle & toss!

  • Drizzle butter all over the surace. Sprinkle with half the salt, then use small sieve to dust with half the icing sugar.
  • Toss very well in large bowl. Then sprinkle with remaining salt and dust with remaining icing sugar. Toss well again. At this stage you can add more sugar or salt, to your taste – the above quantities make it slightly salty and lightly sweet which I love!

Notes

1. Secret to popcorn that stays crispy is to use clarified butter or ghee (same thing). It’s butter with water and milk solids removed so it has a more intense butter flavour and it won’t make your popcorn soggy.
Sold in jars labelled “ghee” in the Indian section of large supermarkets (Coles/Woolies) and cheaper at Indian stores. Or make your own – it’s super easy and cheaper, lasts for months in the pantry and you will use it to pan fry and roast everything!
In Europe/UK, clarified butter in jars is also quite common.
2. Popcorn Salt – you need to grind salt into a fine powder otherwise it won’t stick to the popcorn, it all ends up in the bottom of the bowl.
3. Storage – transfer to airtight container as soon as it has fully cooled. Will be quite crispy for days! Stovetop popped popcorn is crispier than air popped (ie popcorn maker).
Make it crispier! If it’s softer than you’d like, bake it at 110C/230F for 30 minutes (you can fill the pan 5cm/2″ deep), no stirring required. This makes it super crispy again!
4. Nutrition per cup of popcorn.

Nutrition

Calories: 65cal | Carbohydrates: 7g | Protein: 1g | Fat: 4g | Saturated Fat: 1g | Sodium: 179mg | Potassium: 23mg | Fiber: 1g | Sugar: 1g | Iron: 1mg

Life of Dozer

I huff and puff and express exasperation that he squishes his way into my already crowded shoot area…. but you and I both know that I secretly love that he’s always around!😂

Dozer squeezing into shoot area

The post Slightly Sweet & Lightly Salty Butter Popcorn (stays crispy!) appeared first on RecipeTin Eats.


  • Digg
  • Del.icio.us
  • StumbleUpon
  • Reddit
  • RSS

Low Fodmap Sweet and Sour Pork Meatballs

I love Sweet and Sour anything, so it was one of the first things I adapted for the Low Fodmap diet! Today, after perfecting my recipe, I am very happy to share with you these Low Fodmap Sweet and Sour Pork Meatballs! To make this dish suitable for the Low Fodmap diet, you need to...

Read More »

The post Low Fodmap Sweet and Sour Pork Meatballs appeared first on Manu’s Menu.


Low Fodmap Sweet and Sour Pork Meatballs was first posted on November 12, 2020 at 8:34 pm.
©2018 "Manu’s Menu". Use of this feed is for personal non-commercial use only. If you are not reading this article in your feed reader, then the site is guilty of copyright infringement. Please contact me at pankarita_78@hotmail.com


  • Digg
  • Del.icio.us
  • StumbleUpon
  • Reddit
  • RSS

Captain Cook used a native Australian plant to fight scurvy. Are Indigenous foods the future?

Captain Cook used a native Australian plant to fight scurvy. Are Indigenous foods the future? submitted by /u/LuckyBdx4
[link] [comments]


  • Digg
  • Del.icio.us
  • StumbleUpon
  • Reddit
  • RSS

Organic chocolate treats are the perfect gift for friends and family this Christmas

Rhiannon Druce, family-owned since 1918, from Junee Licorice and Chocolate Factory can give some amazing insights into the processes used to make organic chocolate and confectionary and talk about it being the go to comfort food for many with sales spiking since covid.. some chocolate lovers are buying up to 12kg of chocolates at a time […]

The post Organic chocolate treats are the perfect gift for friends and family this Christmas first appeared on Australian Food News.


  • Digg
  • Del.icio.us
  • StumbleUpon
  • Reddit
  • RSS

Aus Food News X Iconic wine brand, Orlando, relaunches by reimagining Australia’s most legendary dishes

Orlando are bringing back memories and creating new ones with the relaunch of this classic Australian wine brand. To mark the occasion, Orlando has teamed up with internationally renowned Australian chef, Guy Turland to honour the quintessential Australian home dinner party – Orlando presents Australiana Nostalgia. Leading Australia’s winemaking excellence in the 1950s and 60s, Orlando was a household […]

The post Aus Food News X Iconic wine brand, Orlando, relaunches by reimagining Australia's most legendary dishes first appeared on Australian Food News.


  • Digg
  • Del.icio.us
  • StumbleUpon
  • Reddit
  • RSS

Group Director calls for vital roadmap for events industry amidst reopening of Victoria

The Director of DE Group (Definitive Events Group), Rod Lockwood, is calling for more answers and a detailed roadmap from the Government to reopen the events industry, amidst Victoria’s recent reopening of several other industries. Lockwood, whose group owns several major events companies including GTR Events, GoFish Nagambie, Equine Productions and the Geelong Outdoor Living […]

The post Group Director calls for vital roadmap for events industry amidst reopening of Victoria first appeared on Australian Food News.


  • Digg
  • Del.icio.us
  • StumbleUpon
  • Reddit
  • RSS

Coles cements Australian-first soft plastics recycling technology

Coles has partnered with Victorian recycling organisations RED Group and Replas to pioneer and install a concrete slab carpark made partly out of recycled soft plastics. Under installation at Coles Horsham, the carpark is the first commercial construction project in Australia to make use of Polyrok – a sustainable alternative to aggregate minerals used in […]

The post Coles cements Australian-first soft plastics recycling technology first appeared on Australian Food News.


  • Digg
  • Del.icio.us
  • StumbleUpon
  • Reddit
  • RSS

Two-thirds of Victorians say office workers should be able to return to work in a COVID-safe office now, Roy Morgan Survey

A special Roy Morgan survey into Victoria’s COVID-19 restrictions shows two-thirds of Victorians (66%) say office workers should be able to return to work in a COVID-safe office now like those people working in restaurants, cafes and other retail outlets compared to only 34% who say no. Support for returning to the office is highest […]

The post Two-thirds of Victorians say office workers should be able to return to work in a COVID-safe office now, Roy Morgan Survey first appeared on Australian Food News.


  • Digg
  • Del.icio.us
  • StumbleUpon
  • Reddit
  • RSS

Hommus hacks to impress guests this summer

Forget the customary carrot sticks and cucumber slices for summer entertaining and use hommus to create surprising dishes that will delight at any get together. All without forking out for expensive ingredients. As we break into the warmer months and with the entertaining season fast approaching, the traditional picnic dip can be found in many […]

The post Hommus hacks to impress guests this summer first appeared on Australian Food News.


  • Digg
  • Del.icio.us
  • StumbleUpon
  • Reddit
  • RSS

Opihr Gin the secret to the spice route this summer

Summer is upon us, and after a long winter of closed borders and lockdowns, Australians everywhere are looking forward to reuniting with family and friends and soaking up some time in the sun, over meals and drinks a-plenty. But while we’re still experiencing certain levels of lockdown measures across the country, the idea of travel […]

The post Opihr Gin the secret to the spice route this summer first appeared on Australian Food News.


  • Digg
  • Del.icio.us
  • StumbleUpon
  • Reddit
  • RSS

Dancing patrons spark $10,000 covid breach fine for Leichhardt venue

Odyssey Bar Restaurant in Leichhardt has been hit with a $10,000 fine for COVID safety breaches after CCTV footage showed large groups of patrons mingling and dancing in multiple locations around the venue. The fine comes as a team of 30 inspectors from the NSW Department of Customer Service returns today to south-west Sydney for […]

The post Dancing patrons spark ,000 covid breach fine for Leichhardt venue first appeared on Australian Food News.


  • Digg
  • Del.icio.us
  • StumbleUpon
  • Reddit
  • RSS

Coles unveils innovative Local supermarket in Sydney

Coles is opening its most innovative and tailor-made supermarket yet, inspiring customers with Australian-first sustainability features and a product range personalised to meet the needs of the Chatswood community.  Opening today, the store is part of an expansion of the popular Coles Local format in Sydney, following the successful launch of the concept in Rose […]

The post Coles unveils innovative Local supermarket in Sydney first appeared on Australian Food News.


  • Digg
  • Del.icio.us
  • StumbleUpon
  • Reddit
  • RSS

Deliveroo Introduces $1 Meals with local favourites Gelato Messina, Royal Stacks & Tadka Hut

There may be no such thing as a free lunch but Deliveroo is offering the closest thing to it with its $1 meals! No queues, no competition, no questions asked – simply log on and you’ll be able to order one of the thousands of $1 meals across Australia on Deliveroo this week.  The deal […]

The post Deliveroo Introduces Meals with local favourites Gelato Messina, Royal Stacks & Tadka Hut first appeared on Australian Food News.


  • Digg
  • Del.icio.us
  • StumbleUpon
  • Reddit
  • RSS

Creamy Lemon Herb Baked Risotto (no-stir, no-sauté)

Creamy Lemon Herb Baked Risotto fresh out of the oven

This Creamy Lemon Herb Baked Risotto recipe uses an entirely hands off method of cooking risotto in the oven. Unlike usual risotto recipes, there’s no need to stir, you don’t even need to sauté onion!

It’s incredibly luscious yet also fresh from the herbs and lemon. Pairs especially well with fish, prawns and chicken.

Creamy Lemon Herb Baked Risotto fresh out of the oven

Effortless creamy Baked Risotto recipe

There will always be a place for risotto made the traditional way, stirring leisurely on the stove for a good 25 minutes.

This no-stir no-saute “dump and bake” risotto recipe is for all the other times. It is:

  • incredibly creamy;
  • perfectly cooked “al dente” rice;
  • requires no stirring during cooking – not even once; and
  • does not even require sautéing of onion or garlic beforehand – it “self sautés” in butter in the oven because it floats.

I tell people it is 98.5% as good as the traditional way made on the stove where hot stock is gradually ladled in, and you have to stir constantly for 25 minutes. But truthfully, most ordinary folk would not be able to tell the difference. Hand on heart, it is that good!

Creamy Baked Risotto with Crispy Skin Barramundi
Creamy Lemon Herb Risotto served with crispy skin Barramundi (cook it using the exact same steps in this Crispy Skin Salmon recipe)

What you need for creamy baked risotto

Here’s what you need to make this entirely hands off creamy risotto in the oven. The base recipe is a creamy Parmesan Risotto which is delicious just as it is, but I’ve also added a Lemon Herb flavouring option which is insanely good!

Ingredients in Creamy Baked Risotto
  • Risotto rice – to make risotto, you need to use risotto rice which is called Arborio rice, it’s different to ordinary white rice because it’s got a higher level of starch on the surface which thickens the cooking liquid used and makes the risotto beautifully creamy without the need for cream;
  • Chicken stock/broth – we use a whole carton in this recipe (4 cups / 1 litre). Nice and handy because no measuring is required! Be sure to use low sodium (ie low salt) otherwise the end result will be a touch on the salty side after the parmesan is added;
  • Parmesan – for a umami flavour punch, to compensate for not sautéing the garlic and onion nor deglazing the pot using white wine like I do with all my stovetop risottos like my favourite Mushroom Risotto;
  • Garlic and onion – finely chopped and minced, just like normal;
  • Butter – some for the cooking part, some to stir in at the end. You can cut down on the butter at the end if you insist, but don’t skimp on the butter for the cooking part because the onion and garlic “self-sautes” in the butter. If you cut the butter down, the onion will just boil!

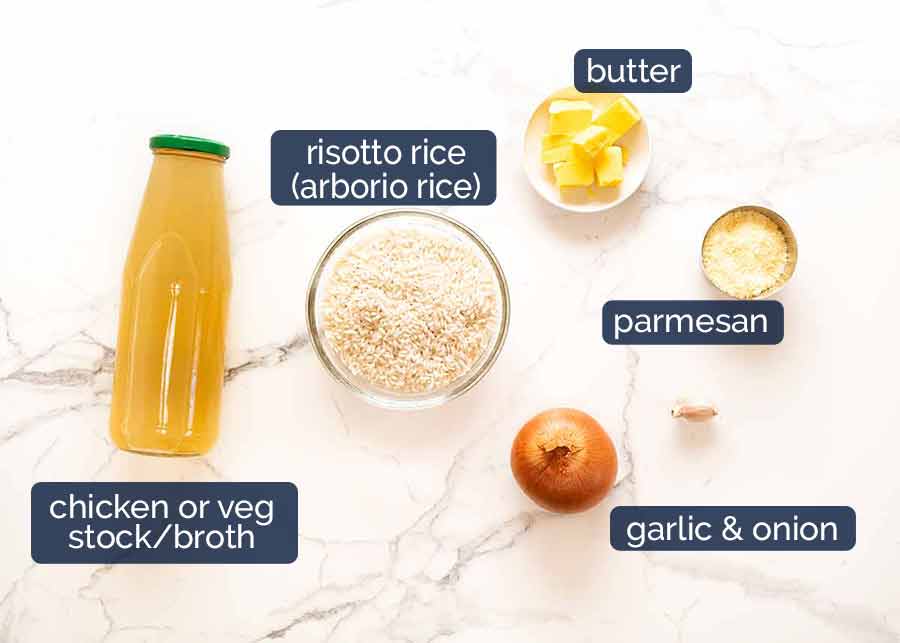
This is what the plain Creamy Parmesan Risotto looks like. I call it “plain” – but there’s certainly nothing plain about how it tastes!!

Creamy Baked Risotto in a casserole pot, fresh out of the oven

Lemon Herb flavouring option

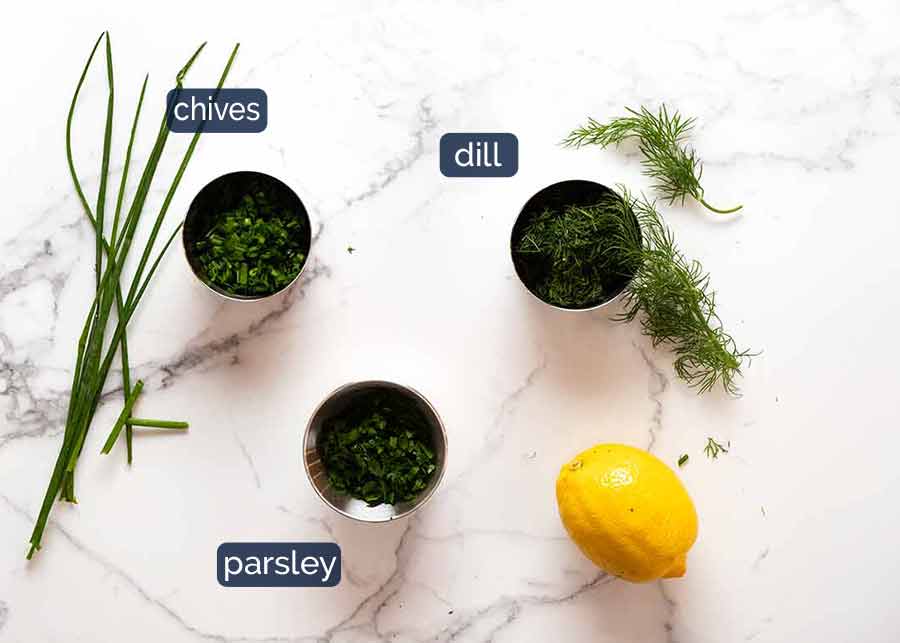
To make the Lemon Herb flavour, all you need is one lemon, and any herbs of choice – I used parsley, chives and dill.

Herbs and lemon for creamy risotto
  • Lemon – we use the lemon rind for lemon flavour, as well as the juice for freshness; and
  • Herbs  – I’ve used a 1-2-3 combination of parsley (1 tbsp), chives (2 tbsp) and dill (3 tbsp). Using a ratio like that is a good way to find a good balance with a herb flavour (dill, in this case) with complimentary flavours (parsley and chives in this case, both of which are more subtle). You can use any herbs you want and it’s easy to figure out how much to add because we just add the herbs in right at the end so just keep adding to your taste!

How to make Creamy Baked Risotto

Recipes don’t get any easier than this – put it all in a dish, cover and bake! (OK OK, there is stirring required at the end, but I still stand that it’s a “dump and bake” recipe!)

How to make Creamy Baked Risotto
  1. Heat stock using whatever means you want – stove, microwave. Just until hot and steamy, doesn’t need to boil. This ensure the rice cooks evenly. Can’t be bothered? That’s fine too. Just add 10 – 12 minutes to the bake time, to factor in the time it takes for the stock to heat up in the oven;
  2. Put everything in casserole dish – the rice, stock, butter, onion and garlic;
  3. Bake 35 minutes – cover then bake for 35 minutes, or until the rice is just cooked. Not all ovens are created equal so it may take a bit longer in yours;
  4. Liquidy – yes it will look watery when you take it out and it won’t look creamy or appetising at all. But have faith! It will become creamy in the next step…
  5. Stir vigorously – Add the parmesan and extra butter, then stir the risotto vigorously until you see the liquid starting to thicken and turn white. By stirring the risotto, you are activating the starch in the risotto which reacts with fat (butter in this case) and thickens the liquid to make it creamy!
  6. Thick and creamy, not dry and stodgy! The risotto should be thick and creamy, and ooze rather than be stodgy and dry. Nobody likes stodgy risotto!
  7. Lemon and herbs last, if using – lastly, add the lemon and fresh herbs. We do this right at the end to preserve the fresh flavour; and
  8. Plate up quickly while it’s still oozy and creamy! If it gets too thick, just add 1 tbsp of boiling water at a time and stir it in well to loosen it up.
Close up of bowl of creamy Lemon Herb Baked Risotto

Reheating Risotto – this one reheats well!

Ordinarily you will read in recipes that risotto does not keep well and that leftovers are just good for making Arancini balls. And there’s no denying that risotto is at its best when freshly made!

However, if you cook the risotto rice so it is just tender (rather than mushy and soft) and the risotto is creamy enough (like pictured) it actually reheats very very well. Nice and creamy, and 100% delicious!

Plate of creamy risotto with crispy salmon
Creamy Lemon Herb Risotto served with Crispy Skin Salmon where readers spied this risotto recipe and requested it!

What to serve with risotto

Risotto is a wonderful side dish that’s somehow both comforting and rustic and can also be plated up very elegantly. I think of it as a side dish / sauce – because it’s so creamy, and ideal for mopping up with each bite of steak or chops, prawns or fish.

The Lemon Herb Risotto is particular excellent with fish, being that fish loves lemon, and the soft texture of the risotto isn’t too harsh against tender fish flesh.

In fact, I’m sharing this risotto recipe today by popular demand after I showed the Lemon Herb Risotto as the side dish for a Crispy Skin Salmon I shared on Monday! That is why the risotto is heavy on the dill – because dill and salmon is a natural pairing! – Nagi x


Watch how to make it

Creamy Lemon Herb Baked Risotto fresh out of the oven
Print

Creamy Baked Risotto (no-stir, no-saute!)

Recipe video above.
Course Sides
Cuisine Italian, Western
Keyword baked risotto, easy risotto recipe, lemon herb risotto recipe, risotto recipe
Prep Time 5 minutes
Cook Time 35 minutes
Servings 5 – 6 as a side
Author Nagi

Ingredients

Risotto:

  • 1 1/2 cups risotto rice (Note 1)
  • 4 cups chicken stock , low sodium (or vegetable)
  • 1/2 onion , finely diced (brown, white, yellow)
  • 1 garlic clove , finely minced (large!)
  • 30g/ 2 tbsp butter , unsalted, cut into 1.5cm / 1/2″ pieces
  • 1/2 tsp black pepper

Finishes:

  • 1/3 cup parmesan cheese , finely grated (store bought pre grated is fine)
  • 30g/ 2 tbsp Extra butter , unsalted, cut into 1.5cm / 1/2″ pieces (Note 3)

Lemon Herb Flavour (excellent with fish & prawns, Note 4):

  • 2 tsp lemon rind (1 lemon)
  • 2 – 3 tbsp lemon juice
  • 1 tbsp parsley , finely chopped
  • 2 tbsp chives , finely chopped
  • 3 tbsp dill , finely chopped

Instructions

  • Preheat oven to 180°C/350°F (all oven types).
  • Heat up the chicken stock until just before boiling using whatever method suits – stove or microwave.
  • Pour the stock into a small casserole pot ~24cm/10″ wide. Then add all the remaining Risotto ingredients – rice, butter, onion, garlic, pepper.
  • Cover with lid or foil, bake 35 minutes or until rice is just cooked – tender but not mushy. The risotto will still look liquidy – that’s what you want to ensure risotto is creamy at the end!
  • Remove from oven, stir ta few times to break up rice. Add Extra butter and parmesan, then stir vigorously until the watery liquid becomes creamy, and mostly evaporates/gets absorbed.
  • Risotto should be oozy and creamy, not thick, gluey or stodgy. If it gets too thick, add 1 tbsp of boiling water at a time to loosen it up, stirring well after each addition.
  • Taste to see if you want more salt or pepper (I do not).
  • Serve while hot and creamy, garnished with more parmesan if desired!

Lemon Herb flavouring option:

  • Add lemon rind, juice and herbs, stir through gently just before serving.

Notes

1. Risotto rice – Risotto needs to be made with risotto rice (Arborio rice) because it’s extra starchy and this is what makes risotto beautifully creamy without the use of cream. Find it in the rice section of grocery stores.
2. Pot/pan – 20cm/8″ square pan also works, or similar volume any other size. Just don’t want to use a giant pan because then the risotto spreads too thin and might dry out.
If you scale recipe up, then you need a larger pot. Or down!
3. Extra butter – if you really want to reduce the fat, you can skip the Extra butter. But do NOT skimp on butter for the cooking phase – it is essential for the onion and garlic to “oven saute” in the butter while it bakes (it floats on the sauce with the butter). Otherwise, the onion just boils in stock – not as nice!
4. Herbs – any other herbs of choice is fine here, easy to adjust because you just add it right at the end and taste to decide when you’ve used enough!
5. Storage & reheating – unlike most risottos, this one will reheat well as long as the rice is cooked until tender not mushy and soft. Keeps 4 days in the fridge, reheat in microwave. Add touch of water if needed to loosen. Note that herbs may lose colour. Also lemon flavour fades, so consider tarting it up with a fresh spritz.

Life of Dozer

That time he tried to plead innocence over the big wet patch on my newly mopped floors….

Dozer wet patch outline on floor
Dozer wet patch on floor

The post Creamy Lemon Herb Baked Risotto (no-stir, no-sauté) appeared first on RecipeTin Eats.


  • Digg
  • Del.icio.us
  • StumbleUpon
  • Reddit
  • RSS

This homesick cook is creating amazing miso from Aussie ingredients

This homesick cook is creating amazing miso from Aussie ingredients submitted by /u/LuckyBdx4
[link] [comments]


  • Digg
  • Del.icio.us
  • StumbleUpon
  • Reddit
  • RSS

Vegan Aloo Gobi – Potato Cauliflower Curry

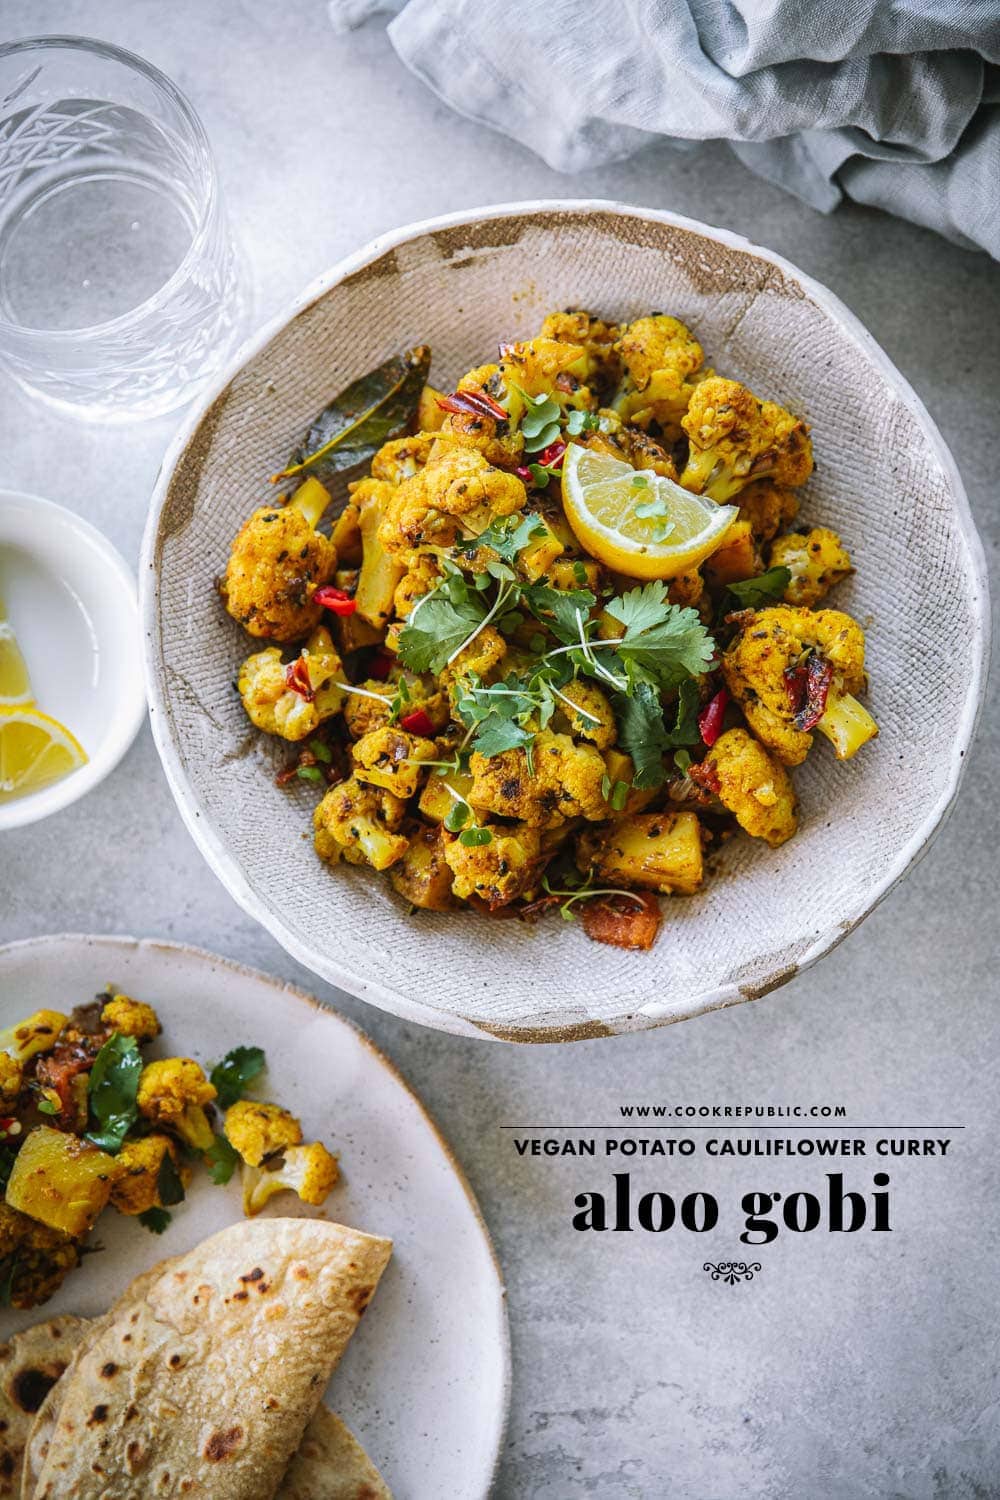
Aloo Gobi is one of the most iconic dishes originating from Punjab in Northern India.  A dry curry of potatoes cauliflower and spices, this simple peasant dish has grown in popularity not only throughout India and Pakistan but globally as well. Naturally vegan, there are as many variations of this dish as the regions who adapt and cook it, but today I will show you how to cook the easiest, most authentic, traditional Aloo Gobi.

Vegan Aloo Gobi (Potato Cauliflower Curry) - Cook Republic #aloogobi #vegandinner #veganindian Vegan Aloo Gobi (Potato Cauliflower Curry) - Cook Republic #aloogobi #vegandinner #veganindian

Vegan Aloo Gobi (Potato Cauliflower Curry) - Cook Republic #aloogobi #vegandinner #veganindian

Without realizing, we have been cooking a lot of Indian Vegetarian recipes and tucking into those on most weeknights. In fact, with Diwali just around the corner, my cute menu board features mainly delicious Indian recipes. Doesn’t it look amazing resting on this glorious concrete benchtop in my freshly renovated kitchen corner? All our meals have a dry curry and I have made Aloo Gobi twice this week (and probably hundreds of times in my lifetime), so I thought I would share this cherished family recipe.

The Role Of A Dry Curry (Or Sabji) In Indian Cuisine

A simple homecooked meal in India on any given day consists of five main components. The first one is Sabji (meaning vegetables) and this is a dry curry or a stir-fry made up of seasonal vegetables. The next one is Dal (meaning lentils) which forms the wet component of the plate. Then there is a chopped raw salad, Roti (flatbread) and Rice. I grew up with this style of eating, my plate usually full of these five fresh, home-cooked components.

Typically if you were too busy to cook all five, you would either make Sabji and Roti or Dal and Rice. This combination makes it evident that a Sabji is for scooping up with Roti (flatbread) and Dal is meant to be eaten with Rice. In a plate, the Sabji takes precedence over everything as it is considered the healthiest element in the plate and a great way to incorporate seasonal vegetables in your diet on a daily basis.


Vegan Aloo Gobi (Potato Cauliflower Curry) - Cook Republic #aloogobi #vegandinner #veganindian Vegan Aloo Gobi (Potato Cauliflower Curry) - Cook Republic #aloogobi #vegandinner #veganindian Vegan Aloo Gobi (Potato Cauliflower Curry) - Cook Republic #aloogobi #vegandinner #veganindian

A Traditional Punjabi Aloo Gobi

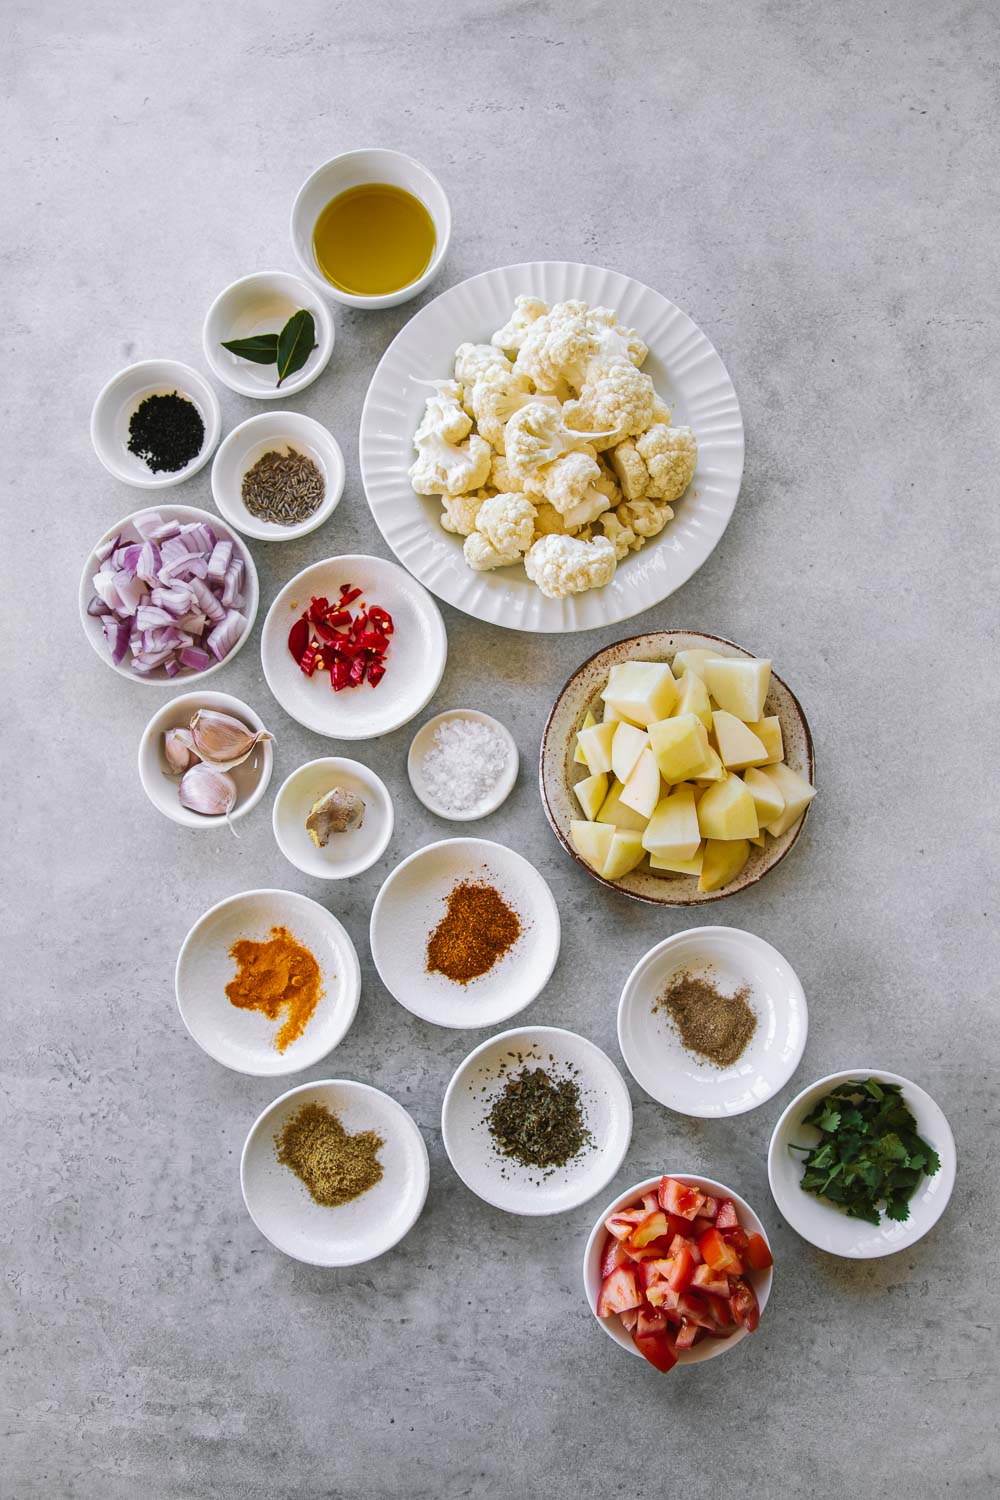
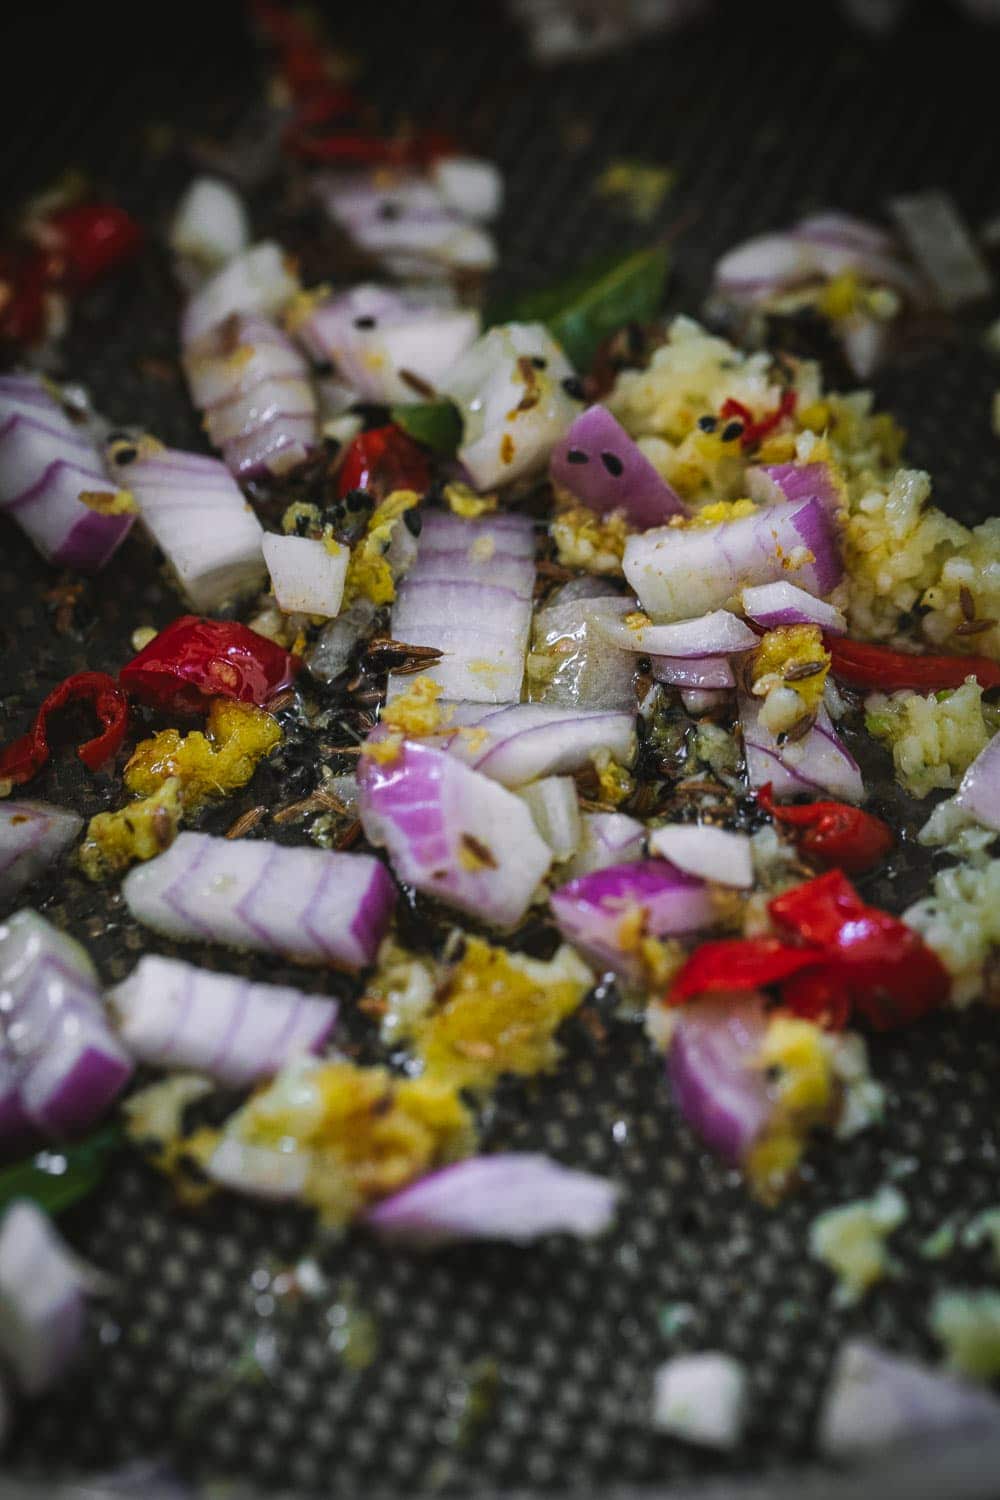
Aloo (potato) is used to make Sabjis all over India. It is cheap as chips, filling and easy to cook. It is usually always paired with another main vegetable. And its pairing with Gobi (cauliflower) is probably the most famous and delicious. A Sabji is usually dry and is cooked using a stir-fry/searing technique followed by a slow cook with a bit of moisture (either water or by adding water-laden vegetables like tomatoes).

I usually cook Aloo Gobi by feel, rather than adhering to strict times. A Sabji is probably easy to make because you cook and you check and you cook and check some more. And when it’s done, it’s done. It can’t get any simpler than that. The only thing to remember is that you need to cook ingredients in a certain order (to ensure that harder vegetables are cooked longer) and you have to resist the urge to add extra water as that can result in a mush at the end.


Taking Vegan Aloo Gobi further

The Guardian has an excellent article about the different versions of Aloo Gobi made by famous food writers and chefs and how they differ from each other. My version is as close to the Aloo Gobi I have had at hundreds of traditional Indian restaurants and roadside eateries in over two decades of living there. It is very close to my dad’s famous Aloo Gobi recipe as well. If done right, Aloo Gobi is a joy to eat. It is perfectly cooked pieces of cauliflower with caramelized edges, tender but firm potatoes – both dry enough to just eat with your hands. And a variety of spices teasing all your senses as you squeeze some lemon and tuck in with gusto.


Once you cook this delightful Aloo Gobi, you can make A Sabji Wrap by slathering some cashew cheese in a large flatbread and layering it with salad leaves, hot sauce and Aloo Gobi. You can also make Spicy Aloo Gobi Toasties by sandwiching this dry curry between two pieces of bread and cooking it in your jaffle maker. This Aloo Gobi also makes a mean base for a Veg Biryani. And finally, it also works really well in tacos!


Vegan Aloo Gobi (Potato Cauliflower Curry) - Cook Republic #aloogobi #vegandinner #veganindian

Vegan Aloo Gobi (Potato Cauliflower Curry) - Cook Republic #aloogobi #vegandinner #veganindian Vegan Aloo Gobi (Potato Cauliflower Curry) - Cook Republic #aloogobi #vegandinner #veganindian


Print
Vegan Aloo Gobi (Potato Cauliflower Curry) - Cook Republic #aloogobi #vegandinner #veganindian

VEGAN ALOO GOBI – POTATO CAULIFLOWER CURRY


  • Author: Sneh
  • Yield: 4
  • Category: Curry, Dinner, Mains
  • Cuisine: Indian, Vegan, Gluten Free, Vegetarian
  • Diet: Vegan

Ingredients

  • 2 tablespoons olive oil
  • ½ teaspoon nigella seeds
  • 1 teaspoon cumin seeds
  • 2 bay leaves
  • 1/2 long red cayenne chilli, sliced*
  • 3 garlic cloves, minced
  • 1 teaspoon grated ginger
  • 1 small red onion, finely chopped
  • 2 medium potatoes (350g), peeled and cut into 3cm pieces
  • 3 cups (450g) cauliflower florets
  • 1 teaspoon sea salt flakes
  • 1 large tomato, roughly chopped
  • ½ teaspoon ground turmeric
  • 1 teaspoon ground coriander
  • 1 teaspoon garam masala
  • ½ teaspoon chat masala or amchur (mango powder)**
  • 1 tablespoon kasoori methi***
  • 2 tablespoons water
  • Freshly chopped coriander leaves, to garnish
  • lemon wedges, to serve

Instructions

  1. Heat olive oil in a wide lidded non-stick cooking pan/sauté pan/dutch oven on medium. Add nigella seeds, cumin seeds, bay leaves, chilli, garlic and ginger. Sauté for a few seconds till the seeds start crackling. Add onion and cook tossing constantly until onions are caramelized.
  2. Add potatoes, cauliflower and salt. Cook tossing constantly for 8-10 minutes until both potato and cauliflower are golden and starting to brown.
  3. Add tomato, turmeric, coriander, garam masala, chat masala and kasoori methi. Mix well.
  4. Reduce heat to medium-low, add water, cover and cook on that slow heat for 15-20 minutes until the potatoes are cooked through. Check often and toss gently to ensure even cooking and avoiding the veggies from sticking and burning. If too dry, add another tablespoon of water. Check and add a bit more salt if required.
  5. Remove from heat, garnish with chopped coriander and serve hot with lemon wedges alongside rotis or rice.

Notes

* Red Cayenne chilli is a thick long chilli with mild to medium heat. If you prefer your curry to not have this spice, just skip it or add only a couple of slices of the chilli.

**Chat Masala or Amchur (Dry mango powder) can be found at Indian grocers or specialty spice shops. If you can’t find these spices, just squeeze half a lemon to add the sour element.

***Kasoori methi is dried Fenugreek leaves. It has a bitter earthy flavour that imparts a delicious warmth and richness to this curry. You can also source this at Indian grocers or specialty spice stores.

The post Vegan Aloo Gobi – Potato Cauliflower Curry appeared first on Cook Republic.


  • Digg
  • Del.icio.us
  • StumbleUpon
  • Reddit
  • RSS