RSS
Showing posts with label Lebanese Main Dishes. Show all posts

MUJADARA PITA ROLL UP

MUJADARA PITA ROLL UP

The Mujadara Pita Roll Up is a great way to eat mujadara, the pilaf of lentils and bulgur with caramelized onions, on the go. Get the mujadara recipe here.

Use large, thin, soft, pliable pita bread for the roll-up. You can cut the pita in half, or just keep one end of the roll-up open and eat from that end. The other end can be wrapped in a napkin.

SERVINGS: 1 | RECIPE BY: MAUREEN ABOOD

INGREDIENTS

1 large pita, thin and soft

1/4 cup labneh or Greek yogurt

A few pickled turnips, lifft

A few fresh mint leaves

1 cup mujadara (Click to see recipe)

INSTRUCTIONS

1. Lay the pita flat on a plate or work surface. Spread the labneh over the center area of the pita. Scatter the pickles and mint evenly over the labneh. Spoon the mujadara evenly across the middle of the pita. 

2. Cut in half on an angle, and serve immediately.

MUJADARA PITA ROLL UP

MUJADARA PITA ROLL UP


  • Digg
  • Del.icio.us
  • StumbleUpon
  • Reddit
  • RSS

Gluten-free Vegan Samosa, Two Ways

Gluten-free Vegan Samosa

Author: Nada E. (one arab vegan)

Recipe type: Snacks and SidesCuisine: Middle Eastern

Prep time:  20 minsCook time:  10 minsTotal time:  30 mins

Serves: 8 samosas

Ingredients

For the potato filling

1 medium potato, peeled and mashed

1 small onion, finely chopped

1 clove garlic, crushed

½ cup peas and carrots (frozen will do)

1 tsp cumin powder

1 tsp ground coriander

2 tsp organic coconut oil

¼ tsp turmeric powder

½-1 tsp curry powder

Sea salt and black pepper to taste

For the cheese filling

1 3oz serving of firm tofu

2 tbsp of tofutti cream cheese

1 tbsp nutritional yeast

2 tbsp finely chopped parsley

1 tsp extra virgin olive oil

1 tsp lemon juice

Sea salt and black pepper to taste

4 sheets of rice paper

Instructions

Start by preparing the filling - in a medium pot heat coconut oil before adding the cumin, coriander and curry powder along with the onion. Sautee until translucent before adding in the peas and carrots.

Stir on medium heat for a few more minutes before adding in the mashed potato at turmeric. Mix well with a fork to combine and season with salt and black pepper as desired.

For the cheese filling, combine all ingredients in a shallow bowl and mix until thoroughly combined.

Set aside the filling to cool and prepare the rice paper sheets - you'll need a large shallow tray with lukewarm water. Soak each sheet in the water on each side for a few seconds before transferring to a cutting board. Cut the sheet in half using a sharp knife (it's important to do this before the sheet goes completely soft).

You should now have two half-circle sheets which will start to soften up. Spoon the filling 1-2 tsp or so into the corner of each sheet and fold in alternating directions to make a triangle, then roll the loose edges to seal.

To cook either place in an air fryer for 6 minutes on 200 C or bake in a pre-heated oven or grill (180 C) until slightly golden and crispy. If baking, brush with a tiny bit of coconut oil to avoid sticking.

Serve immediately, as the rice paper naturally wilts when it gets colder and loses a bit of it's crisp.

Notes

For the potto filling, if you prefer a spicy blend, add some chili powder to the spice mix.

Working with rice paper is tricky at first, but it holds up extremely well in place of wheat pastry – and is deliciously light and versatile.


  • Digg
  • Del.icio.us
  • StumbleUpon
  • Reddit
  • RSS

LEBANESE LENTIL-SPINACH SOUP

LEBANESE LENTIL-SPINACH SOUP

HANDS-ON TIME 5 mins

COOK TIME 30 mins

TOTAL TIME 35 mins

Author: Erica (coffee & quinoa)

Yields: 4 servings

INGREDIENTS

2 tsp olive oil

1 medium yellow onion, diced

1/2 tsp kosher salt

1/2 tsp black pepper

1 Tbsp cumin (yes, Tbsp)

1/2 tsp coriander

5 cups vegetable stock

2 cups split red lentils, picked over and rinsed

pinch of cayenne

juice of 2 lemons + extra lemon wedges for serving

2-3 cups thinly sliced fresh spinach leaves

INSTRUCTIONS

Heat olive oil in a soup pot over medium heat. Once hot, add onion, salt and pepper and saute until onions are soft, 4-6 minutes. Add cumin and coriander and saute an additional 30 seconds. Add vegetable stock and lentils and bring to a simmer. Cover and simmer over low heat until lentils are falling apart, 15-20 minutes.

Remove from heat and puree until smooth with an immersion blender. (You can also puree it in batches in a regular blender. Just make sure the steam has room to escape so it doesn't explode all over your kitchen!)

Stir in cayenne and lemon juice. Taste and adjust seasonings. If necessary, return to stove until hot.

Ladle into bowls and top each with a large handful of sliced spinach leaves. Serve with extra lemon wedges and enjoy!

Leftovers will keep covered in the fridge for up to a week. Some separation is normal; just stir together while reheating. The soup will thicken as it sits, so feel free to add more water to get it back to your desired consistency.

NOTES

If red lentils aren't available, feel free to use green or brown. Just know that they will take longer to cook - at least 30 minutes.


  • Digg
  • Del.icio.us
  • StumbleUpon
  • Reddit
  • RSS

Basbousa with Cream (Basbousa Bl Qeshta)

Creamy and easy to make basbousa Bl Qeshta. Moist, spongy, sweet and melts in your mouth.


Ingredients

First layer:

Medium semolina: 1 cup

Sugar: 3/4 cup

Vegetable oil: 1/2 cup

Eggs: 2 

Vanilla: 1 teaspoon

Baking powder: 1 tablespoon

Cream: 1 can (175 grams)

The second layer:

Liquid milk: 2 cups

Cream: 1 can (175 grams)

Kiri cheese: 4 pieces (put in the microwave for 20 seconds)

Corn starch: 4 tablespoons

Sugar syrup:

Sugar: 1 cup

Water: 1/2 cup

Vanilla: 1/2 tsp

Lemon juice: 1 teaspoon

Ghee: 1 tsp

To decorate:

Pistachio

Directions

Preparing the syrup:

1. In a saucepan, add sugar and water. Put it on a high heat until it boils and the sugar dissolves, then add the lemon juice. Reduce the heat and let it boil for 10 minutes, then add the vanilla and buttermilk, stir the syrup, then turn off the heat.

Preparing the first layer:

1. In an electric mixer. Add semolina, sugar, vegetable oil, eggs, vanilla, baking powder, and cream. Turn on the mixer and mix the ingredients well.

2. Prepare a medium-sized cheesecake mold and brush it with butter.

3. Put half the amount of the basbousa mixture in the mold.

4. Place the mold in the preheated oven on the middle rack and bake at 180C degrees until the sides are golden.

Preparing the second layer (the cream):

1. In a saucepan, add milk, cream, corn starch, and Kiri cheese (in a small dish, put it in the microwave for 20 seconds, then mash it).

2. Stir the ingredients while they are cold, then put them on medium heat with constant stirring until 1 minute after boiling.

3. After removing the mold from the oven, pour the hot cream over the first layer of basbousa. Spread the cream well.

Preparing the third layer:

1. Place the other half of the basbousa mixture over the cream layer.

2. Turn the oven on from the top and place the mold on the lower rack until it is golden (about 8 minutes).

3. Take out the mold from hte oven and pout half a cup of lukewarm syrup on the basbousa.

4. Put the mold in the refrigerator (fridge) for at least two hours.

To serve:

1. Garnish the basbousa with the pistachios, then cut it and serve.


  • Digg
  • Del.icio.us
  • StumbleUpon
  • Reddit
  • RSS

Top 10 Most Popular Lebanese Dishes

1. Hummus 

(Houmous, Hommus, Hummus b’tahini)

Hummus


This internationally popular, beige-colored spread is traditionally made with mashed chickpeas, tahini sesame paste, lemon juice, and garlic. People across the world love hummus for its tangy flavor and the fact that it is filled with nutrients.

When served, it is typically dressed with a drizzle of olive oil, and is then used as a dip for vegetables or a flavorful filling for flatbreads such as pita. Even today, not much is known about its origins, although the earliest mention of hummus dates back to 13th-century Egypt.

Hummus is sometimes additionally enriched with spices such as cumin and paprika, and it can be garnished with anything from fresh herbs, cucumbers, and chopped tomatoes to olives, pine nuts, and hard-boiled eggs.

SERVE WITH

Falafel  Pita Bread

VIEW RECIPE

2. Ma'amoul 

(معمول‎‎, Mamoul, Mamool, Maamoul)

Ma'amoul


Ma'amoul is an ancient cookie filled with fruits and nuts such as dates, walnuts, and pistachios. The cookies are traditionally prepared for Easter, festivals, and celebrations, and they are typically shaped into balls or domes. In order to differentiate the cookies, the walnut version is usually shaped into a dome with a round top, the date ma'amoul is shaped into a dome with a flat top, while the pistachio ma'amoul has an elongated, oval shape.

It is not uncommon for the cookies to be topped with powdered sugar for extra sweetness, and they are often served with coffee or tea during the day in many Middle Eastern households.

SERVE WITH

Arabic Coffee

VIEW RECIPE

3. Falafel 

(Ta'meya)

Falafel

Falafel is a deep-fried ball or patty made from ground chickpeas, fava beans, or both. Falafel is a traditional Middle Eastern food, commonly served in a pita, which acts as a pocket, or wrapped in a flatbread known as taboon; "falafel" also frequently refers to a wrapped sandwich that is prepared in this way. The falafel balls are topped with salads, pickled vegetables, hot sauce, and drizzled with tahini-based sauces. Falafel balls may also be eaten alone as a snack or served as part of a meze tray (assortment of appetizers).

Falafel is a common dish eaten throughout the Middle East. The fritters are now found around the world as a replacement for meat and as a form of street food.

SERVE WITH

Pita Bread  Tahini  Hummus

VIEW RECIPE

4. Shawarma 

(Shawurma)

Shawarma

Marinated and spit-roasted, shawarma is a delicious Middle Eastern meat treat whose origins can be traced back to the Ottoman Empire era, while its name stems from the Arabic pronunciation of the Turkish word çevirme (lit. to turn; turning), and refers to the rotating skewer on which the meat is cooked.

Shawarmas are made with either lamb, turkey, chicken, beef, or a mix of different meats which are slow-cooked for hours and basted in their own juices and fat, gaining an incomparable succulence, but the real secret to a perfect shawarma is in the marinade.

Depending on the variety, the meat must be marinated for at least a day, preferably two, especially when using beef. These marinades are either yogurt or vinegar-based and typically include spices and flavorings such as cinnamon, cloves, cardamom, nutmeg, black pepper, allspice, dried lime, spicy paprika, garlic, ginger, lemon, bay leaf, and sometimes even orange slices.

Shawarma is traditionally served either on its own or enjoyed tucked inside a warm flatbread such as pita or lavash. However, what really sets it apart from the Turkish döner kebab, Greek gyros, or other similar foods is the extent of garnishes and condiments offered with it.

Shawarma is often complemented with garlic mayo or a zesty toumaia garlic sauce, both fresh and pickled vegetables, salads like tabbouleh or fattoush, and amba sauce–a tangy chili and mango pickle dip.

Once a common staple of the Middle Eastern working man, shawarma has today become the ultimate Arabic street food, found not only in Arabia and Levant but in virtually any nook and corner of the globe.

VIEW RECIPE

5. Manakish

(مناقيش‎‎, Lebanese Pizza, Manaqish, Manaeesh, Manakeesh, Managish)

Manakish

Manakish is a favorite Lebanese breakfast - a round, flat bread that is typically topped with olive oil and zaatar (sesame seeds, thyme, and sumac), then baked in the oven. Other toppings might include cheese, minced lamb, spinach, or fried eggplants.

The name of the dish means decorated or stamped, referring to a technique where the dough is pressed using the tips of one's fingers, leaving a decorative pattern in the process. Although it is sometimes affectionately called Lebanese pizza, it is a recent addition to the Lebanese culinary heritage, but it quickly became one of the most popular dishes due to its flavors, low price, and the ease of preparation.

Manakish is often associated with being food for the poor, but it is enjoyed by all classes of society. It is recommended to pair it with tomatoes, cucumbers, yogurt cheese, or a cup of hot tea.

VIEW RECIPE

6. Tabbouleh

(Tabouli, Taboule, Taboli, Tabouleh, تبولة‎)

Tabbouleh

Tabbouleh is a colorful Lebanese national dish that is usually considered a salad, with a crunchy and chewy texture, made with fresh, finely chopped parsley leaves, olive oil, bulgur wheat, and chopped mint leaves as a base. It originated in the mountains of Lebanon and Syria, where edible herbs that are used in tabbouleh were consumed by Arabs since Medieval times.

Usually served as an appetizer, it is sometimes accompanied by pita bread, baba ghanoush, or hummus. Chopped red tomatoes, diced cucumbers, fresh lemon juice and minced onions can be added to the salad, imparting a tangy flavor. It is best to refrigerate tabbouleh for a few hours before serving to improve its taste.

Its refreshing flavors are ideal for a hot summer day, while bulgur provides a rich source of fiber, protein, and minerals, making tabbouleh one of the healthiest food options in Lebanon. Tabbouleh is so popular that it even has its own day, celebrated every year on the first Saturday in July.

VIEW RECIPE

7. Fattoush

(فتوش‎‎, Fattush, Fatush, Fattoosh)

Fattoush

Fattoush is a simple salad made with traditional pita bread as a base on which the rest of the ingredients are built on. Pita bread is torn or cut into small bite-sized pieces, then toasted, grilled, or fried. It is then mixed with a variety of vegetables such as lettuce, radish, crunchy cucumbers, cherry tomatoes or regular tomatoes, peppers, onions, and (occasionally) garlic.

All ingredients are chopped and cut into pieces and mixed with a generous amount of herbs, most commonly mint and parsley. The final touch to this authentic salad is the dressing, usually made with olive oil, lemon juice, and pomegranate syrup. The key ingredient, next to the crunchy pita bread, is sumac - a spice commonly used in the Levantine area.

Sumac can be added to the dressing, and it is usually sprinkled on top of a prepared salad. It gives the dish a slightly tart taste and zest, which perfectly matches with the gentle flavors and aromas of fresh herbs and vegetables. The original fattoush is highly versatile, and other common additions may include crisp pomegranate seeds, olives, yogurt, and feta cheese.

It is one of the most famous salads frequently eaten in Lebanon, Syria, Palestine, Jordan, and Iraq. This refreshing salad belongs to a group of dishes popularly called fattat, which use the stale pita, or any other flatbread, as the star ingredient.

VIEW RECIPE

8. Sfiha

(Lahm Bi Ajĩn , صفيحة‎‎, Pide, Esfiha)

Sfiha

Sfiha, or lahm bil ajĩn (lit. meat on dough) is an Arabic specialty that dates back to the 15th century, when it first appeared in today's Eastern Lebanon. The traditional open-faced meat pie is popular throughout the Arab region, its main ingredients usually including minced lamb, chopped onions and tomatoes, spices, olive oil, and yogurt.

Originally, the dish was prepared by stuffing ground lamb and spices in brined grape leaves, but it evolved over time. Sfiha is also popular in Brazil and Argentina, where it was brought over by Levantine immigrants. It is usually consumed hot as a snack, accompanied by tahini sauce or a bowl of yogurt, while pomegranate seeds, coriander, or chopped cucumbers are often used as garnishes.

VIEW RECIPE

9. Fatteh

(فتّة‎‎, Fetté, Fatta)

Fatteh

Fatteh is a Levantine specialty made by combining pieces of fresh, toasted, or stale flatbread with numerous other ingredients. The name of the dish means to tear into small pieces, referring to the process of tearing the flatbread. Fatteh is usually consumed for breakfast or in the evening as the main dish.

There are two main varieties of fatteh - Levantine and Egyptian. The Levantine version is traditionally topped with yogurt, chickpeas, olive oil, and cumin. After the main toppings, Levantine fatteh can additionally be topped with chicken, lamb, or pine nuts.

The Egyptian version is usually prepared for feasts and is topped with rice, tomato sauce, garlic, and vinegar. Fatteh does not need to look neat, and is very easy to prepare, so even the most careless cook can turn the dish into a masterpiece, which might be the key to its popularity.

VIEW RECIPE

10. Kibbeh

(Kibbe, Kebbah, Kubbeh, Kubbah, Kubbi, Kebbeh, Kebbe)

Kibbeh

Kibbeh is a unique mixture of soaked bulgur wheat and other ingredients, typically lamb meat, and it is also considered the national dish of Lebanon. Fragrantly spiced and eaten as a snack for casual or celebratory meals, Kibbeh can be raw, baked, fried, stuffed, or prepared in a vegetarian version, stuffed with potatoes, pumpkins, and tomatoes.

It is typically served with mint leaves and drizzled with olive oil. The word kibbeh stems from an Arabic verb meaning to form into a ball or a circular shape. A fried variety of kibbeh, called kibbeh nabilseeyah is shaped into a ball, stuffed, then fried in oil.

Raw kibbeh is called kibbeh nayyeh, where bulgur and meat are combined with spices and pureéd onions, kneaded together with some ice water, then placed into traditional flatbreads. Traditionally, the Lebanese used to kill animals on Sundays and feast days, so the raw meat was eaten immediately, and that's how kibbeh nayyeh came to be.

VIEW RECIPE


  • Digg
  • Del.icio.us
  • StumbleUpon
  • Reddit
  • RSS

Garlic Grilled chicken, Greek Style!

Garlic Grilled chicken, Greek Style!

Greek Style with Dill Yogurt Dip

Simple to make, garlic grilled chicken recipe. This one is Greek style with lemon, herbs and garlic served with a yogurt dip. If you have time, marinade it overnight, otherwise 2 hours is fine.

A perfect recipe for entertaining whether inside or outside for a tasty BBQ. If inside, make sure you heat up that griddle pan so you get plenty of smoky char flavour. For the dip, you can leave out the cayenne pepper if you don’t like spicy but it’s awesome spicy! Use a good quality full fat Greek natural yogurt and fresh dill for that beautiful flavour.

Serve it with potato wedges and a Greek salad, see my recipes. Pita bread also goes well. Enjoy my Garlic Grilled chicken Greek Style!

Ingredients

For the Grilled Chicken

5 tbsp olive oil

5 garlic cloves, minced

Juice of 2 lemons

1 tsp oregano

½ tsp Thyme

1 tsp smoked paprika

Salt and pepper

8 boneless, skinless chicken thighs

For the yogurt

1 cup natural Greek yogurt

2 garlic cloves, minced

3 tbsp olive oil

Juice of 1 lemon

½ tsp cayenne pepper (or to taste)

Salt

1 cup chopped fresh dill

Steps

 Step 1

For the chicken marinade. In a mixing bowl, place 3 tbsp olive oil, 5 minced garlic cloves, juice of 2 lemons, oregano, thyme, smoked paprika, salt and pepper. Mix well.

 Step 2

Cut chicken thighs in half and smother into the marinade mix. Coat each piece well, cover bowl, and leave to marinate in the fridge, 2 to 12 hours. The longer the better, even 24 hours.

 Step 3

For the dill yogurt sauce. In a mixing bowl, add the Greek yogurt, minced garlic cloves, olive oil, lemon juice, cayenne pepper, salt and freshly chopped dill. Cover and refrigerate until ready to use.

 Step 4

Using a griddle or BBQ, grill the chicken pieces a few at a time (4 or 5 pieces) until nicely charred and caramelised on each side. If you have marinade juices left over, simply brush it on the chicken as it’s grilling using a pastry brush. Leave to rest on a hot plate for 10 minutes before serving. Once all the pieces are cooked, you can toss all the pieces back in the pan with any left over marinade for a quick reheat and that shiny appearance.  Serve with scattered dill, and the dipping yogurt sauce.

Video: Click to watch the video


  • Digg
  • Del.icio.us
  • StumbleUpon
  • Reddit
  • RSS

Delicious Mahshi Malfouf (Stuffed Cabbage Rolls)

Stuffed cabbage rolls (malfouf or mahshi malfouf) cabbage leaves stuffed with ground meat, rice, spices, and cooked in a lemony garlicky sauce.


Ingredients

Cabbage: 4 kg

Water to boil cabbage

Salt: 2 tbsp

Cumin: 1 tbsp

The filling:

Short grain rice: 3 cups / soaked 1/2 hour

Turmeric: 1/2 teaspoon

Vegetable oil: 1/2 cup

Minced meat: 500 gr

Salt: 1 tablespoon

Cumin: 1 teaspoon

Black pepper: 1 teaspoon

Allspice (Seven Spice Mix): 1 teaspoon

For preparing the pot:

Salt: 1 1/2 tablespoon

Cumin: 1 teaspoon

Garlic (to taste)

Chicken broth powder: a sachet of 20 grams

*******

Lemon juice: 1 small cup

Mashed garlic: 5 cloves

Dry mint: 1 teaspoon

Directions

1. In a deep saucepan, put a generous amount of water, bring to a boil over a strong heat. Add salt and cumin and stir a little.

2. Using a knife, remove the neck of the cabbage head, put the cabbage in the water and let it boil vigorously for about 3 minutes. Flip it on the other side and bring to a boil for another 3 minutes.

3. Using a fork or knife, carefully remove the tip of a leaf of cabbage so that it separates softly from the head. Leave it for a few seconds in boiling water until it becomes soft. Take it out. Repeat this step by gradually separating the leaves from the head of the cabbage.

4. Note: Any leaf that is not soft should be put back in hot water.

5. Let the boiled leaves cool a little. Using scissors or a knife, remove the cabbage stems.

6. Cut the large cabbage leaves into smaller pieces (approximately 8-10 cm) to make the rolling process easy.

7. Preparing the stuffing: In a plate, put the rice, turmeric, vegetable oil, ground meat, salt, cumin, black pepper, and allspice (seven spice mix). Mix the ingredients well with hand.

8. Take a leaf of cabbage, put a little stuffing on the tip, then roll it well.

9. In a large saucepan, add a layer of cabbage stems with some salt and cumin. Put some garlic cloves, then lineup the stuffed rolls carefully. Sprinkle about 1 1/2 tablespoon of salt, 1 tsp of cumin, and chicken stock powder over the cabbage rolls.

10. Place a piece of clay or a heavy plate on top of the cabbage.

11.- Pour hot water over cabbage. Cover the bowl. Let it stand for an hour and a half on medium heat, until it is cooked. Pour lemon juice and crushed garlic and sprinkle with dried mint.

12. Cover the saucepan and cook on medium heat for 5 minutes.

13. Serve on a large plate and garnish with lemon and garlic. Bon appetite.


  • Digg
  • Del.icio.us
  • StumbleUpon
  • Reddit
  • RSS

Mediterranean Ground Beef and Rice

Mediterranean Ground Beef and Rice

This Mediterranean Ground Beef and Rice dish is made with chickpeas and full of flavor. It's a quick, easy-to-make one pot meal the whole family will love!

Course: Entree | Cuisine: lebanese, Mediterranean

Prep Time: 5 minutes | Cook Time: 25 minutes | 6 servings

By: Yumna Jawad |Source: Feel Good Foodie

Ingredients

1 tablespoon olive oil
1 onion chopped
1 pound lean ground beef
1 teaspoon 7 Spice
1 ½ teaspoons salt
½ teaspoon black pepper
1 15-ounce can chickpeas rinsed and drained
2 cups long-grain white Basmati rice rinsed
3 ½ cups chicken broth
Fresh parsley for serving

Instructions

1. In a large pot of medium heat, heat olive oil in large pot. Add the onions and ground beef and season with the 7 Spice and 1/2 teaspoon of salt. Cook until the onions are soft and the ground beef is browned, about 5-8 minutes.

2. Add the chickpeas and the rice, remaining 1 teaspoon of salt and stir to combine. Pour the chicken broth or water on top.

3. Mix all the ingredients together, bring to a boil, then reduce the heat to low, cover with a tight-fitting lid and simmer for 15 minutes, until the rice is fully cooked. Remove from heat but keep covered, and allow the steam to continue cooking the rice for 5-10 more minutes.

4. Fluff the rice, sprinkle with fresh parsley and serve warm.

What do you serve with beef and rice?
We usually enjoy this meal with a salad and my kids love eating it with plain yogurt. You can also serve it with a side of vegetables.

Mediterranean Ground Beef and Rice

Notes

Storage: Store any leftovers in an airtight container. They will last up to 4 days and can be reheated on the stovetop.

Substitutes: You can add in whatever vegetables you have to this dish. You can use water or vegetable broth in the place of chicken broth. If you’d like to use quinoa, make sure to decrease the amount of liquid you’re using by 1 cup.

Nutritional Data: Please note that the nutrition label provided is an estimate based on an online nutrition calculator. It will vary based on the specific ingredients you use.

Nutrition
Calories: 365kcal | Carbohydrates: 52g | Protein: 21g | Fat: 7g | Saturated Fat: 2g | Cholesterol: 47mg | Sodium: 1143mg | Potassium: 475mg | Fiber: 1g | Sugar: 1g | Vitamin A: 99IU | Vitamin C: 11mg | Calcium: 37mg | Iron: 3mg


  • Digg
  • Del.icio.us
  • StumbleUpon
  • Reddit
  • RSS

traditional Syrian Meat Pies (Sfeeha)


A pliable thin bread topped with juicy, perfectly spiced ground meat that's made in minutes and will please your taste buds.

Ingredients

 2.5-3 dozen pie
7 cans Pillsbury Grands Butter Tastin' (8 per can)
2 lbs. ground beef (80% lean)
32 oz. plain yogurt
10 oz. pomegranate molasses
1 tbsp. sea salt
1 tsp. black pepper
1/2 cup lemon juice
Butter
Pine nuts

Steps

1. Chop sweet onions finely. Use a food processor. So much easier.

2. In a large mixing bowl mix ground beef, yogurt, pomegranate molasses, onions, sea salt, black pepper and lemon juice thoroughly.

3. Grease a half sheet bakers pan with melted butter. Flatten 6 dough circles on the pan to about 6"diameter. Create a border around the dough to hold the mixture in place during cooking and for aesthetics. Do this by folding up a 1/4 bead of the dough around the edges, pinching it as you go to form a"braid."

4. Spoon and spread the meat mixture ensuring that all the dough is covered up to the border. Finish by sprinkling pine nuts on the top.

5. Preheat oven to 475 degrees. Cook pies for about 10-15 minutes until dough bottom and edges are golden brown.


  • Digg
  • Del.icio.us
  • StumbleUpon
  • Reddit
  • RSS

Tabbouleh Hummus Platter

Tabbouleh Hummus Platter

SERVINGS: 6 RECIPE BY: MAUREEN ABOOD

The key to smooth, luscious hummus is to make every ingredient the best it can be. Peeled chickpeas are essential to the texture of your hummus, which you can get here. To skin your own canned or cooked chickpeas, saute the chickpeas over medium heat with a touch of baking soda, then put them in a bowl with lots of water. Agitate and rub the chickpeas with your fingers and pour off the water with skins; repeat several times. Plate the tabbouleh and hummus right before serving, and serve with crisp romaine leaves, little romaine gems, or thin pita bread--all of which can be torn and used to pick up the tabbouleh and hummus to eat.

INGREDIENTS

FOR THE HUMMUS:
2 cups cooked peeled chickpeas (cooktime for pre-peeled dry chickpeas is about 90 minutes)
1 clove garlic, green sprout removed, minced
1/2 cup tahini, well-stirred before measuring
1/2 teaspoon kosher salt
Juice of 1 lemon
Chickpea cooking water, or water, as needed
Extra virgin olive oil, for finishing
FOR THE TABBOULEH:
1/4 cup fine bulgur
2 bunches curly parsley, washed, dried, picked from stems, and finely chopped
1 large ripe tomato, seeds removed and finely diced
2 scallions, thinly sliced
Handful fresh mint leaves, finely chopped
2 tablespoons extra virgin olive oil
Juice of 1 lemon
1 teaspoon kosher salt
Few grinds black pepper
1 teaspoon Mint Salt or dried mint, crushed, plus more for finishing

INSTRUCTIONS

MAKE THE HUMMUS:
1. In the bowl of a food processor, puree the chickpeas and garlic until a thick paste forms. Give this a full 3 minutes to get the chickpeas very well pureed. With the machine running, add the tahini, salt, and lemon juice. Taste and see if you'd like the hummus thinner or lighter. If so, Slowly add cold cooking liquid or water, a tablespoon at a time, and process for 3 minutes, or until the hummus is very smooth. Taste and
adjust with salt and lemon juice as needed.

MAKE THE TABBOULEH:
1. In a small bowl, rinse the bulgur and barely cover with cool water. Set aside to soften while you chopped the herbs and vegetables.

2. In a medium bowl, combine the chopped parsley, tomatoes, scallions, and mint. Add the bulgur, and season the salad with the olive oil, lemon juice, salt, pepper, and dried mint. Taste and adjust as needed.

ASSEMBLE THE PLATTER:
1. On a beautiful platter about 12"- to 14"-inch platter, dollop the hummus on one side and create a well out of 3/4 of the hummus, leaving the center flat. Spoon the tabbouleh onto the platter, partially over the center of the hummus and filling the other side of the platter. Drizzle the hummus generously with olive oil, and dust with more dried mint. Serve immediately.


  • Digg
  • Del.icio.us
  • StumbleUpon
  • Reddit
  • RSS

Kafta and Potato Stew

This traditional Lebanese kafta and potato stew is a hearty meal that the whole family will love! Seasoned meatballs are cooked in a rich tomato sauce for a healthy and delicious meal.

Prep Time: 15 minutesCook Time: 40 minutes8 servings
By: Bethan Daunter | Feel Good Foodie

It’s a hearty, wholesome, delicious meal that my family goes crazy for! For me, it all comes together in one pot and I can serve it with everyone’s favorite vermicelli rice!

Kafta and Potato Stew

This is also commonly called Yakhnet Batata – which translates to Potato Stew. It is also more commonly called Kafta Bil Suniyeh – which translates to kafta in the pan.

Traditionally this is made like a kafta and potato casserole, where the kafta is lightly browned on the stovetop and then everything is transferred to a casserole dish and baked in the oven. I make it easier by doing it all in one pot so there’s no need to transfer anything over or turn on the oven.

How do you make kafta and potato stew?

Prepare the potatoes
Peel the potatoes and slice them. You can set them aside until you’re ready to fry them or start frying them while making the kafta patties.

potato

Prepare the kafta
Pulse the parsley in a food processor, remove and set to one side. Pulse the onions until finely chopped. Return the parsley back into the blender along with the beef and spices. Pulse to combine, being careful not to overblend. You can also mix together with your hands in a bowl.

Form the mixture into patties.

Kofta patties

Cook the kafta and potato stew

1. Fry the potatoes. This step is optional and you don’t want to cook them all the way, but it makes the potatoes hold their shape better when cooked and adds another dimension of flavor. Set aside.
2. Brown the kafta on both sides. Again, you don’t want to cook them all the way, but you just want to brown them to get good color and add flavor. You will have to cook them in batches.
3. Return the potatoes on top of the cook kafta.
4. Add the vegetables on top of the kafta and potatoes to make the stew.
5. Add the tomato sauce.
6. Add the water, bring to a boil and simmer covered until the vegetables are tender and meat is cooked.

Kafta and Potato Stew

Tips for making kafta and potato stew

1. Bake it in the oven instead. The more traditional way to make the kafta and potato stew is in the oven. I recommend that you still cook the kafta patties on a skillet to brown them and deepen their flavor. You can also cook the potatoes if you’d like. Then transfer all the ingredients to an 9×13 oven safe pan and bake covered at 375°F for 20-25 minutes.
2. Adjust the sauce thickness to your liking. With two cans of tomato sauce, I prefer to add 2 cups of water which is about 6 cups of total liquid. You can check on the thickness halfway through cooking and then adjust to your liking.
3. Use ground beef with 10-20% fat. Although I always prefer using leaner meat, in this case, it’s like cooking meatballs where the fat in the ground beef helps to really flavor the dish as it all simmers together for a period of time.
4. Grate onions if you don’t have a food processor. It’s important for the onions to have a fine texture so they mix well with the ground beef and patties. Using a grater is an excellent alternative if necessary.
5. Drain extra moisture in onions if necessary. If you pulse the onions in the food processor or grate them, and notice that they are very moist, you can use a paper towel to dab off extra moisture.

Frequently asked questions

Can you make it ahead of time?
I love serving this as soon as it is made, but if you have leftovers they will keep well in the fridge for 3 days. You can make the kafta patties ahead of time and keep them covered in the fridge until you are ready to make the rest of the recipe.

Can you use another meat?
I like to make beef kafta for this kafta and potato stew as it works so well with the other flavors. If you prefer, you can also make them with lamb.

What is 7 Spice?
Seven spice is a mixture of spices that differs depending on the region. I use Lebanese 7 Spice that is store bought. To make your own 7 Spice, you can use equal amounts of ground black pepper, paprika, ground cumin, ground coriander, ground cloves, ground nutmeg, and ground cinnamon.

Kafta and Potato Stew

Hope you try this hearty healthy kafta and potato stew for your family. Whether it’s a recipe that you remember your family making or something new you’re looking forward to trying, you won’t be dissapointed!

If you try this healthy-ish feel good Kafta and Potato Stew recipe or any other recipe on FeelGoodFoodie, then please come back to rate the recipe and leave me a comment below! I would love to hear about your experience making it. And if you snapped some shots of it, share it with me on Instagram so I can repost on my stories!

Kafta and Potato Stew

This traditional Lebanese kafta and potato stew is a hearty meal that the whole family will love! Seasoned meatballs are cooked in a rich tomato sauce for a healthy and delicious meal.

Course: Main CourseCuisine: lebanesePrep Time: 15 minsCook Time: 40 minsTotal Time: 55 minsServings: 8 servingsCalories: 471kcal Author: Yumna Jawad

Ingredients

To make the kafta patties
½ cup loosely packed chopped parsley
1 onion quartered
2 pounds ground beef
1 tablespoon 7 Spice
1 teaspoon cumin
1 teaspoon cinnamon
1 teaspoon coriander
⅛ teaspoon cayenne pepper
1 teaspoon salt
½ teaspoon black pepper

To make the stew
3 tablespoons olive oil divided
6-8 Yukon potatoes sliced
1 onion sliced
2 tomatoes sliced
½ green pepper sliced
2 15 ounce cans tomato sauce

Instructions

To Make the Kafta
1. Place the parsley in the bowl of a food processor and pulse until finely chopped, remove and set aside. In the same food processor bowl, place the quartered onion and pulse until finely chopped.
2. Return the parsley back to the bowl of the food processor with the onions. Add the ground beef to the food processor in addition to all the spices. Pulse once or twice until ingredients are well combined and form a pasty meat mixture.
3. Transfer the mixture to a large bowl and form into patties 1 inch in thickness. It will make about 12 patties.

To Assemble and Cook the Stew
1. In a large pot or deep skillet over medium heat, heat 2 tablespoons olive oil. Add the sliced potatoes and saute them lightly to brown the edges, about 3-4 minutes total. You may have to work in batches. Set potatoes aside.
2. Add 1 more tablespoon olive oil to the skillet, place half the kafta patties and cook for 1-2 minutes per side until they’re lightly browned but not fully cooked. You will need to to work in batches.
3. Transfer the cooked potatoes on top. Add the onions, tomatoes and green peppers on top. Pour the tomato sauce along with 2 cups water and carefully stir everything together. Bring mixture to a boil, then simmer covered for 30 minutes.
4. Serve warm over vermicelli rice, if desired.

Notes
Storage: If you do have any leftovers, you can keep them in the fridge in an airtight container for three days.
Freezing Instructions: You can also freeze the kafta stew for up to 3 months. Freeze individual portions or the entire dish in a baking dish. Thaw in the fridge overnight and re-heat at 350°F for 10 minutes until warmed through.

You can also freeze the kafta patties alone before or after cooking them.
- To freeze them prior to cooking, lay them on a flat baking dish in the freezer for at least 4 hours. When frozen, place them in an airtight bag. Thaw in the fridge overnight and cook per instructions.
- To freeze them after cooking, simply store them in an airtight bag after they’ve cooled. To re-heat, thaw in the fridge overnight and bake in a 350°F oven until heated through.

Sourcing: You can find the 7 Spice at Middle Eastern markets, natural-foods stores or even in large supermarkets, often located with other Middle Eastern ingredients or spices.
To make your own 7 Spice, mix together 1 tablespoon each of ground black pepper, paprika, ground cumin, ground coriander, ground cloves, ground nutmeg, and ground cinnamon.

Nutrition: Please note that the nutrition label provided is an estimate based on an online nutrition calculator. It will vary based on the specific ingredients you use.

Nutrition
Calories: 471kcal | Carbohydrates: 31g | Protein: 24g | Fat: 28g | Saturated Fat: 10g | Cholesterol: 81mg | Sodium: 712mg | Potassium: 1213mg | Fiber: 5g | Sugar: 6g | Vitamin A: 1170IU | Vitamin C: 47mg | Calcium: 66mg | Iron: 5mg


  • Digg
  • Del.icio.us
  • StumbleUpon
  • Reddit
  • RSS

How to Cook Rice

Follow this simple guide for how to cook white rice with step-by-step instructions of the best rice to water measurement and perfect timing for fluffy rice!

Prep Time: 2 minutesCook Time: 18 minutes4 servings
By: Bethan Daunter | Feel Good Foodie

This is a complete guide for how to cook rice. Cooking white rice is one of the first skills I was determined to master when I learned to cook from my mom. We serve white rice a few times a month with Lebanese food. It’s a versatile side dish that complements so many different recipes. Now you’ll learn the perfect way to make it for your family!

How to Cook Rice

Does your heart sink when you see the words “serve with rice” at the end of a recipe? Does this supposedly simple component – rice- (!) never live up to the rest of the meal? Memorize the simple steps below for how to cook rice, and you’ll be on your way to cooking perfect rice on your stove. No rice cooker or pressure cooker needed.

Different types of white rice

For this tutorial on how to cook rice, I am using long grain white rice, the country’s most popular variety. It is called long grain because its length of each grain is about five times its width. Other varieties of white rice include:

1. Instant or quick rice – which has been processed for a faster cook time but falls short in the taste department.
2. Jasmine rice – originally from Thailand, which is fragrant and almost sweet tasting.
3. Basmati rice – originally from India, which has nutty undertones.

Step by step stove cooking instructions

Measure one cup of long grain white rice into a cup and level it off. One cup of dry rice will make enough cooked rice for two to three adult servings. (Or two adults and two small children.) The cool thing about this recipe is it is proportional. Always use one part rice to two parts water. Adjust accordingly for the number of people you are feeding.

Pick through to remove any tiny stones or debris, Then, using cold water, rinse the rice thoroughly in a fine-mesh sieve until the water runs clear. This removes excess starch from the rice which can make it gummy – the first key tip for how to cook perfect rice.

How to Cook Rice

Put the rice in a heavy-bottomed pot. Add twice as much cold water as rice. In this case, that is two cups. I also recommend adding salt in this step. I use half a teaspoon of salt per cup of rice. But feel free to adjust to your taste preference.

How to Cook Rice

Now, without covering the pan, bring the water to a boil. Next, stir the rice in order to evenly distribute but don’t over do it.

How to Cook Rice

Turn the heat to low, cover the pan, and cook for 18 minutes. Do not lift the cover to check on the rice. If you do, heat and steam will escape, and this can affect the rice’s texture.

When the time is up though, take the pan off the heat. Again, without removing the cover, let the rice sit and steam for at least five minutes. This step is my second important tip for how to cook perfect rice

Remove the cover and fluff with a fork. And just like that, now you know how to cook rice!

How to Cook Rice

Frequently asked questions

How long does rice take to cook?
Unprocessed white rice needs 15 to 25 minutes on the stove top and at least five additional minutes to steam off heat after done cooking.

How much water do you need to cook rice?
The short answer is it depends on the variety you are making. When in doubt, refer to the package directions.
Long grained rice and Indian basmati rice: 1 part rice: 2 parts water
Jasmine rice: 1 part rice: 1 1/2 parts water
Sushi rice: 1 part rice: 1 part water

How do you store cooked rice?
Cover tightly in an airtight container and refrigerate for up to five days. Reheat with a little water until warmed through.

How long does cooked rice last?
After cooking the rice, it will last for up to 5 days as long as it is stored properly in an airtight container in the fridge.

Can you freeze rice after you cook it?
Yes, you can freeze rice for up to 6 months. For easy storage and quick defrosting, package thin – easily defrosted portions – in ziplock freezer bags that can be stacked in the freezer. Thaw overnight in the fridge and reheat in the microwave or stovetop with a splash of water

How to Cook Rice

Remember the two important steps that will make huge difference in how your stove-top rice comes out: Rinse before cooking and allow to steam off the heat.  Like quality bread, lovely rice takes good food to the next level.  People have been cooking rice for 8,000 years. Now you also know how to cook white rice!

How to Cook White Rice
Follow this simple guide for how to cook white rice with step-by-step instructions of the best rice to water measurement and perfect timing for fluffy rice!

Course: Side DishCuisine: InternationalPrep Time: 2 minsCook Time: 18 minsTotal Time: 20 minsServings: 4 servingsCalories: 169kcalAuthor: Yumna Jawad

Ingredients

1 cup white rice
½ teaspoon salt

Instructions

1. Measure the rice into a cup and level the top.
2. Rinse the rice in a fine mesh sieve thoroughly in cold water until the water is clear.
3. Pour the rice into a pan over a low heat.
4. Add double the amount of cold water, sprinkle with the salt and then bring it to a boil uncovered.
5. Using a wooden spoon stir the rice in the pan to evenly distribute it, but don’t over stir.
6. Cover with a lid and cook on a low heat, for 18 minutes, then turn the heat off.
7. Remove the pan from the heat. Allow the rice to rest in the pot for about 5 minutes, without opening the lid, to absorb all the liquid and steam.
8. Fluff the rice with a fork to separate the grains, and serve.

Notes

Storage: Store any leftovers in an airtight container. They will last up to 5 days in the fridge.

Nutritional Data: Please note that the nutrition label provided is an estimate based on an online nutrition calculator. It will vary based on the specific ingredients you use.

Photo Credit: Erin Jensen

Nutrition
Calories: 169kcal | Carbohydrates: 37g | Protein: 3g | Fat: 1g | Saturated Fat: 1g | Sodium: 293mg | Potassium: 53mg | Fiber: 1g | Sugar: 1g | Calcium: 13mg | Iron: 1mg


  • Digg
  • Del.icio.us
  • StumbleUpon
  • Reddit
  • RSS

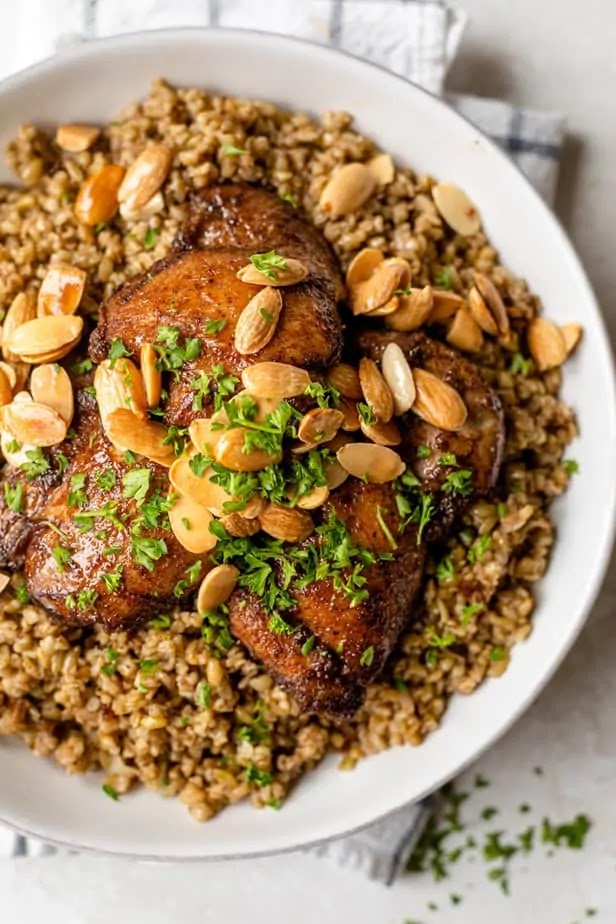
Lebanese Freekeh with Chicken

Freekeh with chicken is a delicious and well-balanced meal made with the ancient grain and served with toasted nuts & herbs. It's a popular Lebanese recipe!

Prep Time: 5 minutesCook Time: 45 minutes
By: Yumna Jawad | Feel Good Foodie

Freekeh with chicken is an easy weeknight meal that is such a delicious, hearty and healthy family dinner. This Lebanese dish is packed full of flavor, high in protein from the chicken and made with whole grain freekeh – it’s perfect for serving a crowd.

Lebanese Freekeh with Chicken


If you are looking for a dish that will add some variety to your weekly meal rotation, this Lebanese freekeh with chicken could be just what you are looking for! So flavorful and so easy to make!

What is freekeh?
Freekeh (also called frikeh or farik) is a grain made from green durum wheat that is roasted and then rubbed to create its flavor. Loaded with protein and fiber, this ancient grain is simple to cook and is a great substitute for rice in dishes.

How to make freekeh with chicken

1. Cook the onions with some olive oil in a heavy bottomed pan until they become lightly brown.
2. Add the soaked freekeh to the onions with some water and cook until the water has evaporated.
3. Fluff the freekeh with a fork, remove from the pan and set to one side.
4. In the same pan, cook the chicken (or you can cook it in a different pan to save time) until its golden and cooked through.

Freekeh with Chicken

The freekeh is cooked when the grains are tender and chewy. This time may vary so double check the package instructions for any variance. Then you can place the cooked chicken over the freekeh and serve to the table garnished with parsley and toasted nuts.

Freekeh with Chicken

Tips for making freekeh with chicken

1. Cook the nuts and chicken in another skillet to save time. For this recipe I cook everything in one skillet starting with the freekeh, then the nuts and finally the chicken. But you can work with 2 or even 3 pans simultaneously to save time.
2. Allow 30 minutes to soak your cracked freekeh. This will help to clean the grains and will ensure that your freekeh is properly cooked as the soaking will help it soften and the texture will be just right. You can soak for up to 24 hours even!
3. Let the freekeh stand for 5 minutes once you’ve cooked it. This allows the grains to soak up any excess water and let them plump and soften further, similar to cooking rice.

Frequently asked questions

Where can I buy freekeh for this chicken dish?
Freekeh is now widely available in stores and you will find it in the grain isle with quinoa or teff. You should be able to find it in your local supermarket. Whole Foods and Walmart both sell it.

Can you freeze freekeh after it’s cooked?
Freekeh freezes really well and I often make a large batch when I cook it to grab for easy meals in the future. Cook the freekeh as directed and then let it cool completely to room temperature. Transfer it to an airtight container or freezer bags and freeze it. I like to freeze the freekeh in portions and place it in bags to save room in the freezer. You can reheat the grains from frozen in the microwave or on the stovetop.

What’s the difference between cracked freekeh and whole freekeh?
Wholegrain freekeh is the whole grain and cracked freekeh is the whole grain that has been cracked into smaller pieces. Cracked freekeh is more widely available in stores and easier to cook with. Whole grain freekeh will require a longer soaking time.

Freekeh with Chicken

I know you will just love this freekeh with chicken recipe. If you haven’t tried freekeh yet, I urge you to pick up a bag of it when you next visit the store. It’s a great addition to your families diet and is so easy to prepare.

If you’ve tried this healthy-ish feel good Freekeh with Chicken recipe or any other recipe on FeelGoodFoodie, then don’t forget to rate the recipe and leave me a comment below! I would love to hear about your experience making it. And if you snapped some shots of it, share it with me on Instagram so I can repost on my stories!

Ingredients

For the Freekeh
2 cups cracked freekeh
2 tablespoons extra-virgin olive oil
1 medium onion diced
1 teaspoon salt
¼ teaspoon black pepper
For the Chicken and Nuts
2 tablespoons extra virgin olive oil divided
½ cup blanched almonds
1.5-2 pounds boneless skinless chicken breast or thighs
Salt and pepper to taste
1 teaspoon allspice or cinnamon
Chopped parsley for serving

Instructions

1. Pick over freekeh to remove any debris, and rinse in cold water until water looks clear. Soak the freekeh in cold water for 30 minutes, then drain and set aside.
2. Heat the olive oil in a heavy-bottomed large skillet or Dutch oven over medium heat. Add the onions and cook until golden brown, about 5 to 10 minutes. Transfer the freekeh over the cooked onions, and season with salt and pepper.
3. Add 3 cups of water, turn heat to high and bring to a boil. Cover and turn heat to low. Cook until the freekeh is tender, about 20 to 25 minutes, stirring a couple times.
4. Season the chicken on both sides generously with salt and pepper and allspice.
5. Transfer cooked freekeh to a serving dish and cover to keep warm.
6. Wipe the skillet with a paper towel, then heat 1 tablespoon olive oil on medium heat. Add almonds and fry, stirring, until golden, 3 to 4 minutes. Remove almonds and set aside.
7. Add the remaining olive oil to the skillet on medium heat and transfer the seasoned chicken to the skillet. Cook for 5-7 minutes on one side without touching, then flip over and cook for an additional 3-5 minutes until the juices run clear and the chicken is cooked through.
8. Lay the chicken on top of the cooked freekeh. Top with reserved fried almonds and garnish with parsley.

Notes
Storage: Store any leftovers in an airtight container. They will last about 3 days in the fridge and can be reheated on the stovetop. The freekeh can be frozen and reheated in the microwave or on the stovetop.

Nutritional Data: The information below is an automated estimate for the chicken tenders. It could vary based on cooking methods and ingredients used.

Nutrition
Calories: 346kcal | Carbohydrates: 29g | Protein: 26g | Fat: 16g | Saturated Fat: 2g | Cholesterol: 81mg | Sodium: 373mg | Potassium: 280mg | Fiber: 5g | Sugar: 2g | Vitamin A: 60IU | Vitamin C: 2mg | Calcium: 51mg | Iron: 2mg


  • Digg
  • Del.icio.us
  • StumbleUpon
  • Reddit
  • RSS

MEDITERRANEAN EGGPLANT SALAD

MEDITERRANEAN EGGPLANT SALAD

Mediterranean Eggplant Salad mixes grilled eggplant with fresh tomatoes, mint, parsley, green onion, bell pepper and tossed with olive oil, lemon juice, za'atar and crushed red pepper. This is the perfect side salad for a summer BBQ or party or to pair with grilled chicken or fish.

PREP TIME 25 minutes
COOK TIME 15 minutes
TOTAL TIME 40 minutes

INGREDIENTS

1 large eggplant {or about 3 lbs.}
Olive oil
Salt & pepper
1 teaspoon za'atar
3 beefsteak tomatoes, diced {about 3 cups of diced tomatoes}
1 bell pepper, seeds removed, chopped {I used half a red and half a green}
5 green onions, green parts chopped
1/4 cup fresh mint, chopped
1 cup fresh parsley, chopped
1 lemon, juiced
Dash of salt & pepper
1/4 teaspoon crushed red pepper
1/2 teaspoon za'atar

INSTRUCTIONS

1. Heat the grill to medium heat. Slice the eggplant into rounds. Rub salt on each side of the eggplant and lay on a baking sheet for an hour. Use a paper towel to pat the eggplant dry and then brush each side of the eggplant generously with olive oil. Sprinkle each side of the eggplant with salt, pepper and za'atar {the za'atar is optional}.

2. Place the eggplant on the grill and cook for 5 minutes. Flip eggplant and grill until browned on bottom and soft. Let the eggplant cool and then chop into small pieces.

3. In a large bowl mix the eggplant with the remaining ingredients and toss lightly to combine.

NOTES
For the eggplant if you want to roast it follow these instructions:
Preheat oven to 475 degrees. Cut eggplants into cubes and spread evenly on two baking sheets. Drizzle olive oil, salt, pepper and za'atar. Roast for 15 minutes, turn the eggplant over and roast for 10-15 more minutes, until the eggplant is soft. Cool and add to the Mediterranean Eggplant Salad.

Source: A Cedar Spoon


  • Digg
  • Del.icio.us
  • StumbleUpon
  • Reddit
  • RSS

Pie maker gozleme bites

Pie maker gozleme bites

0:20 Prep | 0:30 Cook | Makes 10 | Easy

How do you make gozleme even better? Cook it in a Kmart pie maker! It has the same delicious spinach and feta filling and flaky pastry you love in the original.

INGREDIENTS

250g pkt frozen spinach, defrosted, excess liquid drained
100g feta, crumbled
100g (1 cup) coarsely grated mozzarella
1 green shallot, trimmed, thinly sliced
2 tablespoons finely chopped fresh mint leaves
9 sheets filo pastry
70g butter, melted
Greek-style yoghurt, to serve
Lemon wedges, to serve

METHOD

Step 1 Place the spinach, feta, mozzarella, shallot and mint in a large bowl and combine well.

Step 2 Place a sheet of filo on a clean, dry work surface. Brush with melted butter. Place another sheet of filo on top and brush with butter then repeat to make 6 layers in total. Use a sharp knife to cut the pastry in half lengthways and then each in 3 crossways to make 6 even filo stacks.

Step 3 Place a filo stack in each hole of the pie maker, allowing the filo to overhang the side. Spoon filling over filo base until level. Fold the overhanging pastry over the filling. Brush the tops with butter. Turn on the pie maker and close the lid. Cook for 5 minutes. Turn over and cook for a further 5 minutes. Sprinkle with sesame seeds in the last minute of cooking, if using. Transfer to a tray. Cover with foil to keep warm.

Step 4 While the gozleme are cooking, place a remaining sheet of filo on a work surface and brush with butter. Repeat process of layering with the 2 remaining sheets and butter. Fold filo in half and cut into 4 even filo stacks.

Step 5 Repeat cooking the remaining filo stacks and spinach mixture. Place yoghurt in a small bowl. Place gozleme on a serving dish with lemon wedges to serve.

Author: Alison Adams  Image credit: Brett Stevens Publication: Taste.com.au


  • Digg
  • Del.icio.us
  • StumbleUpon
  • Reddit
  • RSS

Turkish pide with green tabouli

Turkish pide with green tabouli

0:30 Prep | 0:45 Cook | 4 Servings | Easy

This Turkish pide is cooked with shortcrust pastry and lamb mince, and is topped with a homemade tabouli.

INGREDIENTS

1 tablespoon extra virgin olive oil
1 brown onion, finely chopped
1 small zucchini, grated
400g lamb mince
2 tablespoons Moroccan seasoning
1 tablespoon tomato paste
4 kale stalks, trimmed, torn into small pieces
2 sheets frozen reduced-fat shortcrust pastry, partially thawed, halved
2/3 cup grated mozzarella
60g reduced-fat fetta, crumbled
1 egg, lightly beaten
Lemon cheeks, to serve

GREEN TABOULI
1/3 cup burghul
2/3 cup boiling water
2 green onions, thinly sliced
1/2 cup fresh flat-leaf parsley leaves, chopped
1/2 cup fresh mint leaves, chopped
2 small green capsicums, finely diced
2 tablespoons lemon juice
1 tablespoon extra virgin olive oil

METHOD

Step 1 Preheat oven to 200C/180C fan-forced. Line a large baking tray with baking paper.

Step 2 Heat oil in a large saucepan over medium heat. Cook onion and zucchini, stirring, for 5 minutes. Increase heat to high. Add mince. Cook, breaking up mince with a wooden spoon, for 5 minutes or until browned. Add seasoning. Cook, stirring, for 1 minute or until fragrant. Add tomato paste. Cook, stirring, for 1 minute. Stir in kale. Remove pan from heat. Cool for 10 minutes.

Step 3 Place 1 piece of pastry on a flat surface. Sprinkle 1/4 of the mozzarella, then 1/4 of the mince mixture, down the centre. Fold up pastry sides and pinch short ends together. Sprinkle with 1/4 of the fetta. Place on prepared baking tray. Brush edge of pide with egg. Repeat with remaining pastry, mozzarella, mince mixture, fetta and egg. Bake for 30 minutes or until golden.

Step 4 Meanwhile, make Green Tabouli Place burghul in a heatproof bowl. Pour over boiling water. Stand for 20 minutes. Drain. Add onion, parsley, mint, capsicum, lemon juice and oil. Season. Stir to combine.

Step 5 Spoon tabouli over pide. Serve with lemon.

Author: Louise Patniotis  Image credit: Chris L Jones Publication: Super Food Ideas


  • Digg
  • Del.icio.us
  • StumbleUpon
  • Reddit
  • RSS

Fattet Chicken Musakhan

Fattet Chicken Musakhan

Learn how to make Delicious Middle Eastern Fattet Chicken Musakhan , following these simple recipe steps.

YIELDS 4 Servings
PREP TIME 30 mins
COOK TIME 1 hr 10 mins
TOTAL TIME 1 hr 40 mins

Ingredients

2.2 lbs (1 kg) chicken
 1 large onion, quarterly chopped
 1 cinnamon stick
 10 whole black peppercorns
 10 whole cardamom pods
 1 tablespoon salt

The Rice:
 2 tablespoons oil
 1/4 cup vermicelli
 1 1/2 cups short grain rice
 1 teaspoon salt

Filling:
 2 loaves of bread, chopped and fried
 3 cloves garlic, crushed
 1/4 cup lemon juice
 2 tablespoons white vinegar
 2 large onions, sliced
 2 tablespoons sumac
 1 teaspoon Arabic Seven Spice Mix (click to see recipe)
 2 tablespoons olive oil

Yogurt Mixture:
 5-6 cups yogurt
 2 cloves garlic, crushed
 1 teaspoon salt

For Decorating:
 Fried pine nuts

Instructions

1. In a high-edge saucepan, place an abundant amount of water and put the pot over medium heat to boil the water.

2. Put the onions, cinnamon, pepper and cardamom inside the chicken cavity. place the chicken in boiling water and add salt. When the water boils again skim off the chicken foam. Cover the pot and let the chicken cook for half an hour or until it is completely tender.

3. Strain the chicken and keep the broth. Remove the skin and bone from the chicken and cut it into small pieces.

4. Rice: Wash the rice several times and soak it in hot water for half an hour.

5. In a medium thick pot base add oil. Put the pot over medium heat and add the vermicelli, stir the vermicelli until golden in color. Strain the rice and add to the vermicelli. stir lightly. Add 1/2 cup of hot chicken broth to the rice. Add the salt. Boil the rice on high heat for 5 minutes, then cover the pot and reduce the heat. Allow the rice to cook for 30 minutes or until tender.

6. Filling: In a deep dish, put garlic, lemon juice and vinegar, stir to mix ingredients.

7. In a deep dish, put onions, sumac, spices and oil. Stir with a fork to mix ingredients.

8. Yogurt mixture: In a deep dish, put the yogurt, garlic and salt, and stir well with a fork until it becomes smooth in texture.

9. To make the Fatteh: Bring a wide, high-edge serving dish. Put the fried bread on the bottom of the dish. Spread a bit of lemon and garlic mixture. Add some hot chicken broth. Add a little of onions and sumac mixture. Distribute the cooked rice with vermicelli. Spread the yogurt and garlic mixture.

10. Spread the chopped chicken over the yogurt. Spread the rest of the lemon mixture, the onion mixture and sumac, and garnish with the fried pine nuts. Serve directly.


  • Digg
  • Del.icio.us
  • StumbleUpon
  • Reddit
  • RSS